Friday, February 29, 2008

DBC: French Bread


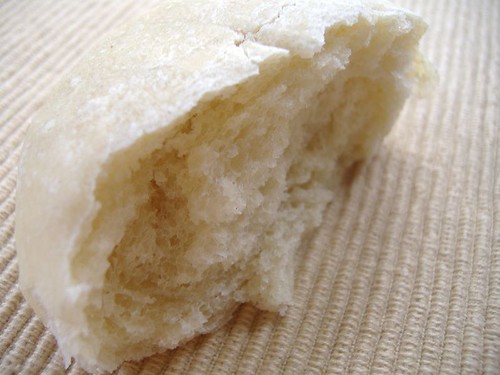
I was really excited about this months Daring Bakers Challenge. Everyone in my entire family knows for a fact that I am a bread fanatic. I am the queen of eating bread. I seriously live of bread. That, as well as carbs (I eat lots and lots of carbs!). And out of the all the types of breads out there, French Bread has to be one of my absolute favorite breads there is.

The only things that really irritates me about making bread is the time. I know making your own bread at home is usually the best (as well as anything made homemade), however, my patients always grows thin when making yeast bread. One of the main reasons as to why I rarely ever make bread at homemade instead of going to the grocery store to buy bread already made.

This months challenge kind of gave me a reason to have to make it homemade. I've made it probably 5 times know this month. After making it once towards the beginning of the month, I was kind of getting use to having to wait. "Patients is always rewarded in the end." So they say... And it's true.

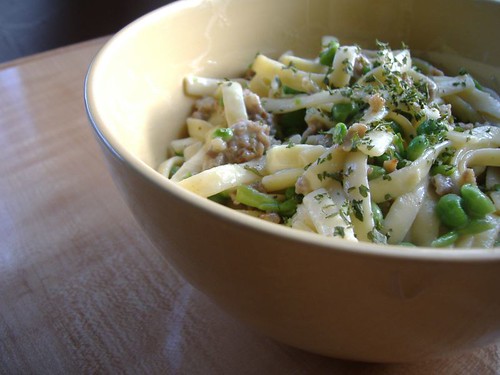
The bread came out really good. I don't think bread really can unnecessarily come out bad if you do it right. I've been enjoying my French Bread this entire month. It's so delicious with Spaghetti with Meat Sauce or Cinnamon-Bacon Carbonara! Or, simply have it alone. Either way, it's delicious!!


Recipe

2 1/4 tsp. dry active yeast
1/3 cup warm water, not over 100 degrees glass measure
3 1/2 cup all purpose flour
2 1/4 tsp salt
1 1/4 cups tepid water @ 70 – 74 degrees/21 - 23C


For the complete recipe, go here. The recipe is HUGE, and it'd take me forever to write it all down up on here. Now, don't let the recipe scare you though. It may be long, but it's not to difficult. Just break it down into steps and you shouldn't have any problem making this delicious bread.

Thursday, February 28, 2008

Chocolate Chunk and Dried Cherry Oatmeal Cookies


At first, to be honest, I didn't know how these cookies would come out. I really was uneasy as to if I would like the combination of the oats, chocolate and the dried cherries. Cherries are pretty tart, so I didn't so if it would go well with the sweetness of the chocolate and oats. Even my boyfriend Chris, when I told him what I was making, he said, "Dried Cherry? Uh..." He has the same reaction as everyone else had when I told them what I was making.

When I toke them out of the oven, it gave off a sweet smell, but I think any cookie really smells delicious as soon as it comes out of the oven, so I didn't jump to conclusions as to if it would be good or not. After letting them cool, I finally got to try the cookies. Both me and Chris were really interested as to how it was, so we couldn't really wait to taste it.

And to our surprise, it was really good! The chewiness of the oats were perfect, the chocolate chunks were delicious, no explanation there, and the cherries... They really do add a nice tartness to the combination of everything and actually helps balance everything together. It was really good. I can't wait to let everyone try these cookies!


Recipe

1 1/2 cup flour
1 tsp. baking soda
1/2 tsp. cinnamon
1/2 tsp. salt
1 cup butter, softened
1 cup brown sugar, packed
2 eggs
1 1/2 tsp. vanilla
3 cups oats
1 cup dried cherries
8 ounces chocolate chunks


1. Preheat oven to 350 degrees.

2. Beat butter and sugar together until smooth. Add eggs, one at a time, mixing each addition. Add vanilla.

3. In a separate bowl, whisk together flour, baking soda, cinnamon and salt. Gradually add the butter mixture until combined. Stir in oats, cherries and chocolate chunks.

4. Drop by tablespoonfuls onto baking sheet lined with parchment paper. Bake for 10-12 minutes, or until bottom edges are lightly browned. Cool on pan for a few minutes, then transfer to wire rack to cool completely.

Makes about 4 dozen cookies

Wednesday, February 27, 2008

Homemade Pizza


After making this, I know vow never to order pizza out again. I, and so has my family, never want to eat pizza out. Making it homemade is so much better! And this recipe is absolutely fantastic! Easy and delicious!


Recipe

Makes enough dough for two 10-12 inch pizzas
1 1/2 cups warm water (105°F-115°F)
2 1/4 teaspoons of active dry yeast
3 1/2 cups bread flour (can use all-purpose but bread flour will give you a crisper crust)
2 Tbsp olive oil
2 teaspoons salt
1 teaspoon sugar


1. In the large bowl of a heavy duty electric mixer (such as a Kitchen Aid), add the warm water. Sprinkle on the yeast and let sit for 5 minutes until the yeast is dissolved. Stir to dissolve completely if needed at the end of 5 minutes.


2. Attach a mixing paddle to the mixer. Mix in the olive oil, flour, salt and sugar on low speed for about a minute. Remove the mixing paddle and replace with a dough hook. Knead using the mixer and dough hook, on low to medium speed, until the dough is smooth and elastic, about 10 minutes. If you don't have a mixer, you can mix and knead by hand.


Preparing the Pizzas


Ingredients
Olive oil
Cornmeal

Toppings such as
Tomato sauce
Mozzarella or Parmesan cheese, shredded
Feta cheese
Mushrooms, thinly sliced
Bell peppers, stems and seeds removed, thinly sliced
Italian sausage, cooked ahead
Chopped fresh basil
Pesto
Pepperoni, thinly sliced
Onions, thinly sliced
Sliced ham


1. Place a pizza stone on a rack in the lower third of your oven. Preheat the oven to 450°F for at least 30 minutes, preferably an hour.

2. Remove the plastic cover from the dough and punch the dough down so it deflates a bit. Divide the dough in half. Form two round balls of dough. Place each in its own bowl, cover with plastic and let sit for 10 minutes.

3. Prepare your desired toppings. Note that you are not going to want to load up each pizza with a lot of toppings as the crust will end up not crisp that way. About a third a cup each of tomato sauce and cheese would be sufficient for one pizza. One to two mushrooms thinly sliced will cover a pizza.

4. Working one ball of dough at a time, take one ball of dough and flatten it with your hands on a slightly floured work surface. Starting at the center and working outwards, use your fingertips to press the dough to 1/2-inch thick. Turn and stretch the dough until it will not stretch further. Let the dough relax 5 minutes and then continue to stretch it until it reaches the desired diameter - 10 to 12 inches. Use your palm to flatten the edge of the dough where it is thicker. You can pinch the very edges if you want to form a lip.

5. Brush the top of the dough with olive oil (to prevent it from getting soggy from the toppings). Use your finger tips to press down and make dents along the surface of the dough to prevent bubbling. Let rest another 5 minutes. Repeat with the second ball of dough.

6. Lightly sprinkle your pizza peel (or flat baking sheet) with corn meal. Transfer one prepared flattened dough to the pizza peel. If the dough has lost its shape in the transfer, lightly shape it to the desired dimensions.

7. Spoon on the tomato sauce, sprinkle with cheese, and place your desired toppings on the pizza.

8. Sprinkle some cornmeal on the baking stone in the oven (watch your hands, the oven is hot!). Gently shake the peel to see if the dough will easily slide, if not, gently lift up the edges of the pizza and add a bit more cornmeal. Slide the pizza off of the peel and on to the baking stone in the oven. Bake pizza one at a time until the crust is browned and the cheese is golden, about 10-15 minutes. If you want, toward the end of the cooking time you can sprinkle on a little more cheese.

Tuesday, February 26, 2008

Heath Bar Cookies


I think I've become addicted to cookies. I really never liked cookies to much till a few months ago. I was always able to pass off a cookies; But now, I can't! I've just come to absolutely love cookies! And I really wanted to make cookies these afternoon; Reaaalllly wanted to make some. But I wanted to make a cookie I hadn't made yet.

I've always been a pretty big fan of the Heath Bars and I usually always have the heath bar toffee pieces or heath bars somewhere floating in the pantry. And I happened to have some in there today. So I decided to make a cookie with the heath bar toffee pieces. I really wanted to add walnuts to this, however, sadly, I had none. It would had been so much better if I had walnuts!

But the cookies came out so good! They were very soft cookies; Really, really soft actually. Which I really liked. You can had 2 minutes to the baking time to have cookies that aren't so soft; But I these cookies are a must try.


Recipe

2 1/2 cups flour
1 tsp. salt
1 tsp. baking soda
1 cup (2 sticks) butter, softened
1 1/2 cups sugar
2 eggs
1 tsp. vanilla
1 1/2 cups chopped Heath Bar pieces (toffee bites)
1/2 cup walnuts (optional)


1. Preheat oven to 350 degrees. Sift flour, salt ad baking soda in a bowl. Set aside. In a separate bowl, combine the heath bar pieces and walnuts. set aside.

2. Cream butter until fluffy. Add the sugar and continue to beat until light and fluffy. Beat in the eggs, one at a time. Beat well. Add vanilla.

3. Alternatively add the heath bar mixture and the flour mixture, a third at a time, until well blended. Chill the cookie dough for at least 30 minutes. An hour would be better.

4. On a cookie sheet lined with parchment paper, spoon the cookies dough in 1-inch diameter balls. Place 3 inches from each other. These cookies do spread, so be careful.

5. Bake for 10-12 minutes, until edges are just starting to brown. Remove from oven then let cool for a few minutes. Then transfer to wire rack to cool completely.

Makes about 6 dozen cookies

Thursday, February 21, 2008

Blueberry Pumpkin Muffins


If I were to choice what muffin to eat, it most likely always going to be a blueberry muffin. If its a muffin, I'd much rather have some blueberries in it. Thats just the way I am. It's how I see a muffin. With lots of yummy blueberries. "Do I know the muffin man? Why yes, and he has a bunch of yummy, delicious blueberries in him!"

Every year when Fall comes around, me and my mom usually always stock up on canned pumpkin. We get so much, that we in the end realize that maybe we got just a little to much... However, it does come to use through out the year. I find it quite hard to find canned pumpkin during spring or summer, for they don't usually have them on the shelfs. But I do love to still have the great tastes of pumpkin every time of the year.

I decided to get out one of my canned pumpkin and put it to some good use. And I sure put it to good use; Delicious use that is! I added pumpkin to a blueberry recipe that I found and it, and it tasted very light, very moist and very tasty. A great low cal snack, holding only 146 calories per muffin. Yes! Can make it much more healthier by using whole wheat flour, and brown sugar instead of white sugar. Still comes out just as good!


Recipe

3/4 cup flour
3/4 cup quick cooking oats
2/3 cup sugar
2 tsp. baking powder
3/4 tsp. salt
1/2 tsp. ground cinnamon
1/2 tsp. nutmeg
1/2 cup canned pumpkin
1/2 cup milk
1 egg
1/4 cup butter, melted
3/4 cup fresh or thawed blueberries


1. Preheat oven to 400 degrees. Grease and flour muffin pans or use paper liners.

2. In a mixing bowl, mix together the flour, oats, sugar, baking powder, salt, cinnamon and nutmeg until evenly blended.

3. In a separate bowl, stir together pumpkin, milk, egg and butter. Gradually add in the flour mixture, just until all ingredients are moistened. Fold in the the blueberries. Spoon matter into 12 muffin cups, filling to the top.

4. Bake for about 20 minutes, then cool for 10 minutes.


Wednesday, February 20, 2008

Garden Lasagna


This recipe has been on my to do list for what seems like forever now. Why I didn't get to it till now, I have no idea. But I wish I had now. I'm a huge lasagna fan. And to be honest, I use to think that lasagna isn't lasagna with out the meat. Well, apparently, I thought terrible wrong after tasting this recipe.

My mother has been on a diet lately, and she's asked me, for when I cook for everyone that I make something light. But, of course to still taste good. So I thought making this lasagna was a great time and also a great opportunity to make it and try it out. This lasagna is filled with a load of delicious vegetables; All my favorites I might add. Had really every veggie that I really loved. However, it also had every veggie that my boyfriend hated in it (who hates anything vegetable).

Side from my boyfriend, everyone else really loved it, especially my mother. She was very pleased. She loved it right away, as did I. This is defiantly become a new favorite recipe of mine, and whats so great about it is I don't have to feel that guilty about eating it! A plus!


Recipe

2 tsp. olive oil, divived
2 1/2 cups zucchini, chopped
2 1/2 cups carrots, thinly sliced
2 1/2 cups broccoli, chopped
1 1/2 cups mushrooms, sliced
1 tsp. salt, divided
1/2 cup all-purpose flour
3 1/2 cups fat free milk (or whole, or 1%)
1 cup grated parmesan cheese
1/4 tsp. pepper
Dash of nutmeg
1 (10 ounce) package frozen chopped spinach, thawed and drained
1 1/2 cups cottage cheese
2 cups mozzarella cheese, shredded
12 precooked or uncooked lasagna noodles *SEE NOTE


1. Preheat oven to 375 degrees. Heat 1 tsp. oil in a pan over medium-high heat. Add zucchini and saute till tender. About 4 minutes. Spoon into a large bowl.

2. Heat remaining 1 tsp. oil in pan and add sliced carrots. Saute for about 4 minutes. Add broccoli and mushrooms. Saute for another 4 minutes or until crisp tender. Add to bowl with zucchini. Sprinkle with salt, toss and set aside.

3. Place flour in a sauce pan. Gradually add milk to flour, stirring with a whisk until blended. Bring to a boil over medium heat and cook for about 2 minutes or until thick. Remove from heat. Add 1/2 cup parmesan, salt, pepper and nutmeg; Stir until smooth. Stir in spinach.

4. Combine cottage cheese and 1 1/2 cup of shredded mozzarella cheese; Stir well. Spread 1/2 cup spinach mixture in the bottom of a 13 x 9" baking dish coated with cooking spray. Arrange 4 noodles over spinach mixture; Top with half of cottage cheese mixture, half of vegetable mixture, and about 1 cup spinach mixture. Repeat layers, ending with noodles. Spread remaining spinach mixture over noodles, and then sprinkle with remaining parmesan and remaining shredded cheese.

5. Cover and bake for about 20 minutes. Uncover and bake for an additional 20 minutes or until cheese is bubbly and beginning to brown. Let stand for about 10 minutes before serving.


*NOTE: You can either make this with uncooked noodles like I normally do, or make it with precooked noodles. If you prefer your noodles to be a little bit more chewy, and not really soft, then make them with uncooked noodles. Just bake for 30 minute covered, then 20 minute uncovered. If you prefer the normal Garden Lasagna with precooked noodles, then follow the time in this recipe as is.

Wednesday, February 13, 2008

Dark Chocolate Coconut Cookies


Ok. So, I've become a huge fan of watching Bobby Flays show 'Throwdown with Bobby Flay.' I love to see all the people he goes up against and the real people out there that can bake and/or cook so good, that it even better than Bobby Flay (And I use to think Bobby Flay was the best!). The latest episode, Bobby Flay had a cookie throwdown against one of New Yorks favorite bakeries; Levain Bakery.

I've seen this little bakery a few times when walking down 74th st., but, I've never gone in to try anything of theirs. I really wish I did now. After seeing this episode of throwdown, I just wanted to kick myself in the butt and tell myself just how dumb I was for never going into they're bakery while I had the chance.

Soon after watching the show, I was on the internet in search for a recipe of they're delicious looking cookies. It took me awhile, but I came across one. Tried it right away, didn't waste time, wanted to have the cookies right away. And oh my lord! They were so sinful, you can tell just by looking at they're size, but, they were so, so, so flippin delicious! It was heaven...

Now, their original cookies were with walnuts instead of pecans, however, I'm a pecan girl. So I replaced the walnuts with pecans. I'll be sure to go to they're bakery next time I'm in New York. I need to try the real things!


Recipe

2 1/2 cup flour
1/2 cup dark cocoa powder
1/4 tsp. baking powder
pinch of salt
2 sticks butter, softened
1 1/4 cup sugar
2 eggs
1 cup semi-sweet chocolate chips
1 cup large pecan pieces
1 1/8 unsweetened shredded coconut


1. Preheat oven to 350 degrees.

2. In a medium bowl, cream the butter and the sugar together until well blended and fluffy. Add the eggs and beat until well incorporated, then beat in cocoa powder.

3. Mix in flour, salt and baking powder until just combined. Gently fold in remaining ingredients.

4. Transfer dough to a clean work surface and gently mix dough by hand to ensure even distribution of ingredients. Divide into 12 equal portions and transfer on a sheet pan with parchment paper.

5. Bake in the oven for 12-15 minutes. Take care not to over bake. Let cool on rack.


Be sure to store in an airtight container!

Tuesday, February 12, 2008

Red Velvet Cake Balls


The blog Bakerella is one of the few blogs that I really like to keep checking to see what new ideas shes come up with. And I've been meaning to try making her Red Velvet Cake Balls, and for Valentines Days seemed like the right time to make these up for everyone.

I was going to make the cake batter from scratch instead of making it from the box since I don't really like the make cakes from a box, however, I haven't been feeling to well this week, and to make it from scratch just didn't appeal to me. So I took the easy way and went with what Bakerella did; Made it from the box.

They turned out really good and delicious. It was like a little Red Velvet Cake, in ball form. Can't wait to give these out on Valentines Day.


Recipe

1 box Red Velvet Cake Mix
1 can of cream cheese frosting
1 package semi-sweet chocolate bark


1. Bake the red velvet cake as directed for a 13 x 9" cake. After cake is cooked and cooled, crumble the cake into a large bowl.

2. Mix throughly with 1 can of cream cheese frosting. This will be messy.

3. Roll mixture into quarter size balls and lay on a cookie sheet. Should make 55-60 balls. You can use a 1/2 tbsp. spoon to form balls, or you can just use your hands to form as you please.

4. Chill for several hour. You can do this in the freezer to quicken this.

5. Melt chocolate in a double boiler. Roll balls in chocolate and lay in cookie sheet on wax paper until firm. Then, enjoy!


Saturday, February 9, 2008

Oreo Truffles


Thats right. Oreo Truffles. One of my favorite cookies turned into delicious a treat!

Whats great about these truffles is that they are super simple to make! Not hard at all. I came across this blog called Bakerella not to long and she has so many cute, easy idea of making sweet treats! I love all the ideas that she comes up with. They're all so adorable.

When I saw here Oreo Truffles that she made, I knew I need to make them. So I did just that. And Let me tell you... They're super easy, super quick, and super delicious.


Recipe

1 pkg. Oreo Cookies
1 8 oz. Cream Cheese, softened
White Chocolate Bark


1. Finely crush 7 cookies in a food processor or a ziploc bag and crush to a fine consistency. Reserve for later.* See Notes.

2. Crush remaining cookies and stir in cream cheese. Use the back of a large spoon to help mash the two together.

3. Roll the mixture into 1" balls and place on a wax paper covered baking sheet.

4. Melt chocolate as directed for chocolate and then dip the balls into chocolate. Tap off extra and set on waxed baking sheet. You can sprinkle the top with the 7 crushed cookies, or just kept to eat.

5. Once dry, refrigerate and enjoy.


*Notes:
- You don't have to top the truffles with the reserved cookies. You can just not crush them and eat them.
- It helps to freeze the uncoated balls for a few minutes to keep the mixture from falling apart in the melted chocolate.
- To form balls, you can use 2 tsp. to form each ball to make it easier and so that they are all the same size.
- You can easily half this recipe if you don't want to make to many. This recipe makes about 42 truffles, half of this recipe will probably make 21 truffles.


Wednesday, February 6, 2008

Baked Mushroom Macaroni


I'm notoriously known to love macaroni and cheese. Maybe not as much as my boyfriend who lives off it, but close enough. There are two ways people usually like it. Creamy or not. To be honest, I really do not like creamy macaroni and cheese at all. It's just to... Well, creamy. My boyfriend, however, is different. He's a creamy guy. But, he does like the baked macaroni's I make.

It was me and my mom who came up with this recipe. We didn't really know what to make for dinner and we really didn't have much to cook with to begin with. We did however have plenty of cheese! But we didn't necessarily want it to be the same old macaroni and cheese. After looking threw the pantry and pondering for awhile, we found a can of cream of mushroom soup. We thought, "Why not?"

All I got to say is; Yum! And the pepper jack cheese really give it a bit of a spice. Which, I love! Than again, I love pepper jack cheese to begin with, so it just made it even better for me!


Recipe

16 ounce elbow pasta
1 can (10.75 ounce) condensed cream of mushroom
1 tbsp. butter
1/2 tsp. salt
1 tsp. pepper
1/3 cup milk
1 cup shredded mozzarella cheese, plus 1/4 cup
1 cup shredded cheddar cheese, plus 1/4 cup
1 cup processed cheese, chopped (I used VELVETA)
1/2 cup cup pepper jack cheese, chopped


1. Preheat oven to 350 degrees.

2. Bring a large pot of salted water to boil. Add pasta and cook until tender. Drain and set aside.

3. In a medium saucepan, combine butter, milk, and cream of mushroom soup. Add mozzarella cheese, cheddar cheese, processed cheese and pepper jack cheese. Stir until cheese is melted and mixture is smooth. Add pepper and salt.

4. Stir in pasta into cheese mixture and combine the cheese with the pasta. Pour into a 9 by 13 inch baking dish. Sprinkle the top with 1/4 cup mozzarella cheese and 1/4 cup cheddar cheese.

5. Bake for about 20-25 minutes, or until top is golden brown. Let stand for about 10 minutes before serving.


Monday, February 4, 2008

Banana Cookie Bars


I don't know if I have really ever tasted a cookie bar that tasted as good as these. I didn't think anything could necessarily beat my love for banana bread, but this is really making me question whether or not these are better or not.

These cookie bars are really rich and chewy and so darn delicious! To describe what they taste like me would be to say... It's like a slice of banana bread in between two chocolate brownies. That's how I would describe these bars. When you take the first bite, the bananas and the chocolate really come threw very strong. If your a chocoholic, I would defiantly recommend these. If not, a good alternative for instead of a chocolate crust would be a graham cracker crust or even a shortbread version. You could even switch the dark chocolate chips for butterscotch chips or peanut butter chips or even white chocolate chips. Theres a variety away to change it around, but this one is defiantly meant for the chocolate lovers out there.


Recipe

1 1/2 cup flour
1/2 cup unsweetened cocoa powder
1/8 tsp. salt
1 cup butter, softened
3/4 cup confectioner sugar
1 can (14 oz.) sweetened condensed milk
2 bananas, mashed
2 cup dark chocolate chips
1 cup walnuts
2/3 cup shredded coconut


1. Preheat oven to 350 degrees. Line a 13 x 9 inch baking pan with parchment paper.

2. In a large bowl, soft together flour, cocoa powder, and salt. Set aside. In another bowl, beat butter and confectioner sugar until creamy. With two spoons or by hand, stir butter mixture with flour mixture to mix together. Take both spoons and push down the butter mixture with the flour mixture. It will take time, but batter will become moist, but kind of stiff.

3. Press mixture into prepared baking pan and bake for about 15 minutes.

4. In a medium bowl, Mix together condensed milk and bananas until incorporated. Once the crust has baked for 15 minutes, take out and pour the banana mixture over it. Combined chocolate chips, walnuts and coconut together in a bowl and sprinkle over the top.

5. Bake for abut 25-30 minutes. Let cool completely, roughly around 10-15 minutes. Then, chill in the fridge for about an hour. To chill quicker, place in the freezer for 25 minutes. These are much better when chilled. After chilled, cut into desired sizes.


Friday, February 1, 2008

Tagliatelle with Smashed Peas, Sausage, and Ricotta Cheese


To be honest, I'm not a big fan of peas. However, I came across this recipe the other day, and I thought it would be a good dish to my boyfriend Chris, who actually likes a vegetable! Chris, my picky eater boyfriend is so picky that it literally will sometimes drive me insane. Theres a lot that I can't cook with because of the fact that he can't stand some of the things I cook with. And me being me, I use a lot of different spices and love to add a lot of vegetables to my food; Which he hates.

For example, I can't cook with onions. He will ultimately taste it right away if I cook with it. It's ridiculous! I can't cook with carrots or garlic and nor can I cook with broccoli, spinach or green beans. Most of them being vegetables and also being stuff I love to cook with, which, makes it hard for me to cook something for him that he'll actually enjoy and like.

The recipe sounded pretty easy and something that he'd actually eat since there were peas in it. I didn't really instead to really eat it because I'm not to big of a fan for peas, but I decided to at least try it. And to my surprise, I now have a new liking for peas. I think I came to dislike peas from my mother whom would always buy the canned peas with all the juice, which I loathed! The dish was actually kind of light, not to heavy, and really satisfing. Best part, there was garlic in this dish and Chris didn't even notice! Hehe.


Recipe

1 pd. tagliatelle pasta
2 tbsp. olive oil
2 cloves garlic, chopped
1 pd. hot italian sausage, casings removed
1 pd. frozen peas, thawed
1 cup whole milk ricotta cheese
1 bunch of basil leaves, chopped (about 3/4 cup)
1/4 cup grated pecorino romano cheese
1 tsp. salt


1. Bring a large pot to a boil on medium-high heat. Add the pasta and cook until tender but still firm to the bite. Drain and reserve one cup of the pasta cooking water. Set aside.

2. In a large skillet, heat the olive oil and garlic over medium-high heat and add the sausage. Use a wooden spoon the break up the sausage into bite size pieces. When sausage starts to brown, after about 5 minutes, set aside.

3. Add the peas to the pan and using the back of the wooden spoon, smash the peas. Turn off the heat. Add the ricotta cheese along with the cooked pasta and toss to coat, adding the reserved cooking water in 1/4 cup additions, if needed, to moisten the pasta.

4. Return sausage to the pan. Add the basil, pecorino romano cheese, and salt. Toss gently to coat and serve immediately.


Genesis of a Cook
check out Tastespotting