

Daring Bakers Challenge has finally come! This months challenge was one that I was pretty excited about. It's actually something that'd I'd been wanting to make for sometime. In fact, I still have in tags in my mems.
After last months challenge, the Opera Cake, which I sadly didn't get to do, I was really bummed. It was something that I really wanted to make too! But, there was a lot going and, unfortunately, I never got around to making it... But, I definitely made sure that this months I'd have time to sit down and bake this months challenge.
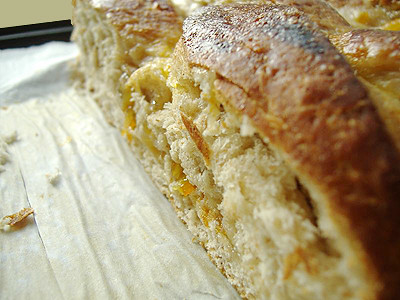
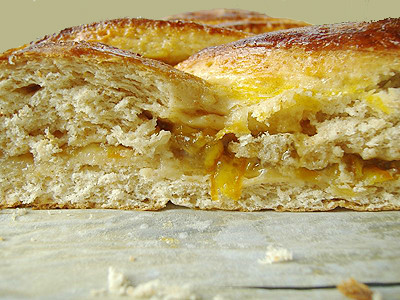
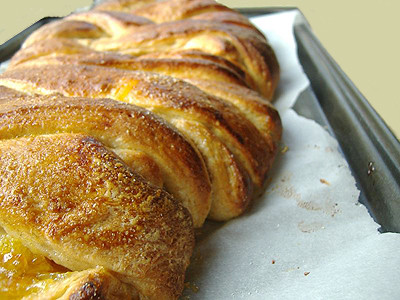
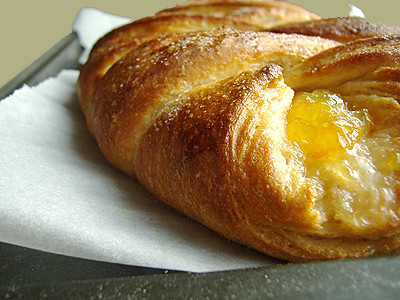
Since this was my very first Danish Braid, I kind of struggled with the making of the braid. It doesn't necessarily look like a 'braid', but more so of like a messy design of lines. But, it still look gorgeous in its own way. The whole making of the dough however was very easy. Not difficult at all. It was just when I was cutting the dough that I got aggravated. I screwed up on some of the cutting and I knew that I couldn't just take it back. But I was fine with it.
For the filling, I used a Orange Marmalade. It just sounded something that'd go really well with the dough, in my opinion. I love citrus filling and flavors. So, I knew that for me, as well as everyone else in the house (who all love citrus as much as I) would like the idea as well. In the end, it was really good, and I love having it for breakfast. And, surprisingly, it wasn't that difficult. I plan on making this again. There's so many different filling I could use!

Recipe
For the Dough
1 tbsp. active dry yeast
1/2 cup whole milk
1/3 cup sugar
Zest of 1 orange, finely grated
3/4 tsp. ground cardamom
1 1/2 tsp. vanilla
1/2 vanilla bean, split and scraped
2 large eggs, chilled
1/4 cup fresh orange juice
3 1/4 cups all-purpose flour
1 tsp. salt
For the Butter Block
1/2 pound (2 sticks) cold unsalted butter
1/4 cup all-purpose flour
1. Combine yeast and milk in the bowl of a mixer fitted with the paddle attachment and mix on low speed. Slowly add sugar, orange zest, cardamom, vanilla extract, vanilla seeds, eggs, and orange juice. Mix well.
2. Change to the dough hook and add the salt with the flour, 1 cup at a time, increasing speed to medium as the flour is incorporated. Knead the dough for about 5 minutes, or until smooth. You may need to add a little more flour if it is sticky. Transfer dough to a lightly floured baking sheet and cover with plastic wrap. Refrigerate for 30 minutes.
3. If using without a standing mixer, Combine yeast and milk in a bowl with a hand mixer on low speed or a whisk. Add sugar, orange zest, cardamom, vanilla extract, vanilla seeds, eggs, and orange juice and mix well. Sift flour and salt on your working surface and make a fountain. Make sure that the “walls” of your fountain are thick and even. Pour the liquid in the middle of the fountain. With your fingertips, mix the liquid and the flour starting from the middle of the fountain, slowly working towards the edges. When the ingredients have been incorporated start kneading the dough with the heel of your hands until it becomes smooth and easy to work with, around 5 to 7 minutes. You might need to add more flour if the dough is sticky.
4. For block butter, combine butter and flour in the bowl of a mixer fitted with a paddle attachment and beat on medium speed for 1 minute. Scrape down the sides of the bowl and the paddle and then beat for 1 minute more, or until smooth and lump free. Set aside at room temperature.
5. After the dough has chilled 30 minutes, turn it out onto a lightly floured surface. Roll the dough into a rectangle approximately 18 x 13 inches and 1/4 inch thick. The dough may be sticky, so keep dusting it lightly with flour. Spread the butter evenly over the center and right thirds of the dough. Fold the left edge of the detrempe to the right, covering half of the butter. Fold the right third of the rectangle over the center third. The first turn has now been completed. Mark the dough by poking it with your finger to keep track of your turns, or use a sticky and keep a tally. Place the dough on a baking sheet, wrap it in plastic wrap, and refrigerate for 30 minutes.
6. Place the dough lengthwise on a floured work surface. The open ends should be to your right and left. Roll the dough into another approximately 13 x 18 inch, 1/4 inch thick rectangle. Again, fold the left third of the rectangle over the center third and the right third over the center third. No additional butter will be added as it is already in the dough. The second turn has now been completed. Refrigerate the dough for 30 minutes.
7. Roll out, turn, and refrigerate the dough two more times, for a total of four single turns. Make sure you are keeping track of your turns. Refrigerate the dough after the final turn for at least 5 hours or overnight. The Danish dough is now ready to be used. If you will not be using the dough within 24 hours, freeze it. To do this, roll the dough out to about 1 inch in thickness, wrap tightly in plastic wrap, and freeze. Defrost the dough slowly in the refrigerator for easiest handling. Danish dough will keep in the freezer for up to 1 month.
Makes 2-1/2 pounds dough
For Orange Marmalade
1 1/2 Oranges, peeled
1/4 Lemon, unpeeled
2 3/4 cups cold water
1 3/4 cup Sugar
1. Remove all white membranes from peeled oranges and slice thin. Slice unpeeled lemon. Cover oranges and lemon with water. Let stand in refrigerator for 24 hours. Boil for 3 hours, add sugar and boil 1 more hour. Put into sterile jars and seal.
To Make the Danish Braid
1. Line a baking sheet with a silicone mat or parchment paper. On a lightly floured surface, roll the Danish Dough into a 15 x 20-inch rectangle, 1/4 inch thick. If the dough seems elastic and shrinks back when rolled, let it rest for a few minutes, then roll again. Place the dough on the baking sheet.
2. Along one long side of the pastry make parallel, 5-inch-long cuts with a knife or rolling pastry wheel, each about 1 inch apart. Repeat on the opposite side, making sure to line up the cuts with those you’ve already made.
3. Spoon the filling or marmalade you’ve chosen to fill your braid down the center of the rectangle. Starting with the top and bottom “flaps”, fold the top flap down over the filling to cover. Next, fold the bottom “flap” up to cover filling. This helps keep the braid neat and helps to hold in the filling. Now begin folding the cut side strips of dough over the filling, alternating first left, then right, left, right, until finished. Trim any excess dough and tuck in the ends.
4. Whisk together the whole egg and yolk in a bowl and with a pastry brush, lightly coat the braid. Spray cooking oil (Pam…) onto a piece of plastic wrap, and place over the braid. Proof at room temperature or, if possible, in a controlled 90 degree F environment for about 2 hours, or until doubled in volume and light to the touch.
5. Near the end of proofing, preheat oven to 400 degrees F. Position a rack in the center of the oven.
6. Bake for 10 minutes, then rotate the pan so that the side of the braid previously in the back of the oven is now in the front. Lower the oven temperature to 350 degrees F, and bake about 15-20 minutes more, or until golden brown. Cool and serve the braid either still warm from the oven or at room temperature. The cooled braid can be wrapped airtight and stored in the refrigerator for up to 2 days, or freeze for 1 month.

39 comments:
Looks delicious! I agree that the hardest part was the braid. I hope to perfect that one day! :)
Your braid looks terrific and the filling is just perfect!
The danish looks really yummy. Glad you got to try laminated dough, it's definitely worth doing again.
I never would have thought of Orange marmalade. I bet it went great with the flavor of the dough! I am a first timer!
Your danish looks great! I bet the orange marmalade was delicious!
Looks delicious Tarah! The Orange Marmalade sounds great addition to the other flavors in the dough!
Doesn't look like you struggled to me - the danish looks perfect!! Love that orange marmalade filling that you chose.
I don't know where exactly you struggle with the braiding - I find your braids beautifully done!
Beautiful Tarah, it turned out lovely!
not so sure what youthink you did wrong - i think it looks just great!
My oh my, this looks delicious to me :) Your photos are lovely - the danish looks scrumptious!!
Nice looking braid. I like the sound of an orange marmalade filling.
I agree, the braid was tricky, but you pulled it off beautifully!
Beautiful braid!
Looks delicious. I like how the orange marmalade is oozing out in that picture.
Shari@Whisk: a food blog
I just want to say your danishes look amazing. Ive been following your blog for a few months now and now I am also a fellow daring baker. :)
Keep up the good work :)
Kelly @
http://anotherbakingblog.blogspot.com
Wow...gorgeous braid!!...I love your photos too!
What a bright-sunny braid! Looks wonderful, so puffy and flaky!
Beautiful! You did a great job!
Cheers,
Rosa
Looks good to me! I couldn't refuse a few slices,
mmmmm mmmmmmk looks great..your photos are always soooo breathtaking!!
Great job! And you gave me an idea - I have some homemade orange marmalade, plus half the dough left in the freezer, so my next Danish is going to be marmalade with cream cheese!
Gorgeous!! and I love your filling, sounds so YUMMY ! !
Your danish is lovely! Great job.
That looks very lovely.
And, just a question, but do the challenges get e-mailed to you?
It looks sooo beautiful! It's so funny because I used orange marmalade in mine, too, but I also added some vanilla custard. It tasted like a creamsicle!
That being said - my braid itself didn't look nearly as beautiful as yours! Congratulations!
Your braid looks great! I love the orange marmalade idea.
Look great! The pictures and the braids came awesome.
the braid looks pretty.. too pretty to eat!
The marmalade gives it such a nice pop of color. Great job!
Wow, your braid looks delicious!!!
I love your photos, they are perfect!
Congratulations!
that looks so yummy!!!
Beaautiful! And the marmalade filling was a stroke of genius.
Well done on your braid!
I was also surprised at how easy this was and plan to repeat it. I'll definitely try it with your marmalade, which sounds delicious. And I love the rustic, almost artisan look of your braid. Great job!
Your blog is beautiful!!! YUM!!
I love that bit of marmalade peeking out in the top picture! So inviting. you did a great job!
Your braid looks beautiful to me!
I love your orange marmalade recipe. I love marmalade and your recipe looks different than most of the recipes I've seen. I have to give it a try.
Post a Comment