Showing posts with label Baked Goods: Pie. Show all posts

Wednesday, October 29, 2008

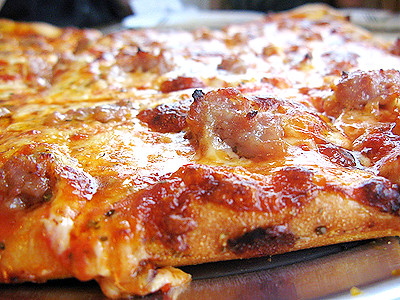
Sausage and Ham Pizza


Honestly, I wish I was more creative with this month. Sadly, by that time I realized that the challenge was done, I'd done nothing creative for pizza. I've already seen other Daring Bakers Pizza, and some of them just wow me to no end. Some sweet ones that I really never thought about. Daring Bakers never cease to amaze me..

I've been rather busy, so I decided to just go the simple route. Sausage, Pepperoni, Ham, etc. The usual's. To be blunt, I was kind of disappointed in a way with this months challenge. It's not that I don't like pizza, I mean, I love pizza. It's just, I'm still waiting to get a challenge where I'm just so excited to trying. I mean, I make pizza dough all the time. It's how my family likes pizza; homemade. Though, I know there are many that don't do this, so this months challenge might of been pretty exciting for some. I want to try something I've never done ;P

All in all though, it's always fun to make pizza from scratch. Can't wait to see the next challenge!

Daring Bakers


Recipe

Makes 6 pizza crusts (about 9-12 inches/23-30 cm in diameter)

4 1/2 cups Unbleached Bread flour or all purpose flour, chilled
1 3/4 tsp salt
1 tsp instant yeast
1/4 cup olive oil or vegetable oil
1 3/4 cups water, ice cold (40° F/4.5° C)
1 tbsp sugar
Semolina/durum flour or cornmeal for dusting


NOTE: If you are using an electric mixer, switch to the dough hook and mix on medium speed for the same amount of time.The dough should clear the sides of the bowl but stick to the bottom of the bowl. If the dough is too wet, sprinkle in a little more flour, so that it clears the sides. If, on the contrary, it clears the bottom of the bowl, dribble in a teaspoon or two of cold water. The finished dough should be springy, elastic, and sticky, not just tacky, and register 50°-55° F/10°-13° C.

Or

2. Add the oil, sugar or agave syrup and cold water, then mix well (with the help of a large wooden spoon or with the paddle attachment, on low speed) in order to form a sticky ball of dough.

3. Flour a work surface or counter. Line a jelly pan with baking paper/parchment. Lightly oil the paper.

4. With the help of a metal or plastic dough scraper, cut the dough into 6 equal pieces (or larger if you want to make larger pizzas).

NOTE: To avoid the dough from sticking to the scraper, dip the scraper into water between cuts.

5. Sprinkle some flour over the dough. Make sure your hands are dry and then flour them. Gently round each piece into a ball.

NOTE: If the dough sticks to your hands, then dip your hands into the flour again.

6. Transfer the dough balls to the lined jelly pan and mist them generously with spray oil. Slip the pan into plastic bag or enclose in plastic food wrap.

7. Put the pan into the refrigerator and let the dough rest overnight or for up to thee days.

NOTE: You can store the dough balls in a zippered freezer bag if you want to save some of the dough for any future baking. In that case, pour some oil (a few tablespooons only) in a medium bowl and dip each dough ball into the oil, so that it is completely covered in oil. Then put each ball into a separate bag. Store the bags in the freezer for no longer than 3 months. The day before you plan to make pizza, remember to transfer the dough balls from the freezer to the refrigerator.


DAY TWO

8. On the day you plan to eat pizza, exactly 2 hours before you make it, remove the desired number of dough balls from the refrigerator. Dust the counter with flour and spray lightly with oil. Place the dough balls on a floured surface and sprinkle them with flour. Dust your hands with flour and delicately press the dough into disks about 1/2 inch/1.3 cm thick and 5 inches/12.7 cm in diameter. Sprinkle with flour and mist with oil. Loosely cover the dough rounds with plastic wrap and then allow to rest for 2 hours.

Or

8. On the day you plan to eat pizza, exactly 2 hours before you make it, remove the number of desired dough balls from the refrigerator. Place on a sheet of parchment paper and sprinkle with a gluten free flour. Delicately press the dough into disks about ½ inch/1.3 cm thick and 5 inches/12.7 cm in diameter. Sprinkle the dough with flour, mist it again with spray oil. Lightly cover the dough round with a sheet of parchment paper and allow to rest for 2 hours.

9. At least 45 minutes before making the pizza, place a baking stone on the lower third of the oven. Preheat the oven as hot as possible (500° F/260° C).

NOTE: If you do not have a baking stone, then use the back of a jelly pan. Do not preheat the pan.

10. Generously sprinkle the back of a jelly pan with semolina/durum flour or cornmeal. Flour your hands (palms, backs and knuckles). Take 1 piece of dough by lifting it with a pastry scraper. Lay the dough across your fists in a very delicate way and carefully stretch it by bouncing it in a circular motion on your hands, and by giving it a little stretch with each bounce. Once the dough has expanded outward, move to a full toss.

Or

10. FOR GF: Press the dough into the shape you want (about 9-12 inches/23-30 cm in diameter - for a 6 ounces/180g piece of dough).

NOTE: Make only one pizza at a time.

During the tossing process, if the dough tends to stick to your hands, lay it down on the floured counter and reflour your hands, then continue the tossing and shaping. In case you would be having trouble tossing the dough or if the dough never wants to expand and always springs back, let it rest for approximately 5-20 minutes in order for the gluten to relax fully,then try again.You can also resort to using a rolling pin, although it isn’t as effective as the toss method.

11. When the dough has the shape you want (about 9-12 inches/23-30 cm in diameter - for a 6 ounces/180g piece of dough), place it on the back of the jelly pan, making sure there is enough semolina/durum flour or cornmeal to allow it to slide and not stick to the pan.

Or

11. FOR GF: Lightly top it with sweet or savory toppings of your choice.

12. Lightly top it with sweet or savory toppings of your choice.

Or

12. FOR GF: Place the garnished pizza on the parchment paper onto the stone in the oven or bake directly on the jelly pan. Close the door and bake for about 5-8 minutes.

NOTE: Remember that the best pizzas are topped not too generously. No more than 3 or 4 toppings (including sauce and cheese) are sufficient.

13. Slide the garnished pizza onto the stone in the oven or bake directly on the jelly pan. Close the door and bake for abour 5-8 minutes.

Or

13. FOR GF: Follow the notes for this step.

NOTE: After 2 minutes baking, take a peek. For an even baking, rotate 180°.

If the top gets done before the bottom, you will need to move the stone or jelly pane to a lower shelf before the next round. On the contrary, if the bottom crisps before the cheese caramelizes, then you will need to raise the stone or jelly.

14. Take the pizza out of the oven and transfer it to a cutting board or your plate. In order to allow the cheese to set a little, wait 3-5 minutes before slicing or serving.

REMARKS:
Tossing links: LinkLink 2,Link 3, Link 4

***************

NOTE ON SAUCE: Your sauce (any) should not be too thick as it will thicken in the hot oven. Less is more but make the less truly more by using quality ingredients.

SUCE IDEAS: Pestos, white or brown sauce, tomato sauce, sour cream, thick cream, Bolognese sauce, etc…
Check here for sauce recipes: http://www.tenspeedpress.com/page.php3?ftr=300


TOPPING IDEAS: Seafood, fish, meat (dry, cured, smoked or ground), cheeses (Gruyère, Gorgonzola, Mozzarella, Provolone, Ricotta, Maroille, Munster, etc…), nuts, tofu, veggies (tomatoes, bell peppers, artichokes, hearts of palm, zucchinis, pumpkin, red onions, etc…), herbs (mixes, fresh or dried), spices (garlic, gourmet salt, pepper, curry, berbere, ras-el-hanout, za’atar, etc…), nuts (pecans, walnuts, cashew nuts, Brasil nuts, macadamia nuts, etc…)….



Wednesday, June 4, 2008

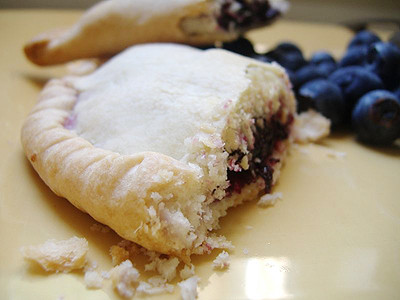
Blueberry Hand Pies


With exams finally over and school coming to an end today, I felt like I should spoil myself a little with the fact of all the stress from studying for exams for the past week. We have a bunch of blueberries that we bought not to long ago that needed to be used (we stocked up on blueberries when there was a sale).

I wanted to make something that would for sure make me feel happy. And what better than pie! A feel good dessert in my opinion. I didn't necessarily want to make a big pie because I knew not everyone would want to eat it (with bikini season here), so I decided to make them in little individual pies. These aren't hard to make at all, and the dough is very good. It's kind of flaky, which I like. If your not into making your own dough or don't have the time, you could always buy store bought dough. That'll be just as good. Either way, they'll turn out great. These were killer!


Recipe

For the Filling

1 cup fresh blueberries
2 tbsp. lemon juice
1 tbsp. cornstarch
1/8 tsp. cinnamon
1/4 cup sugar
Milk for brushing top


For the Dough

1 1/4 cup flour
6 tbsp. butter, cold, cut in small cubes
2 tbsp. shortening
1/8 tsp. salt
3-4 tbsp. ice water


1. For the filling, in a medium heavy saucepan over medium heat cook blueberries, sugar, cornstarch and cinnamon. Stir frequently until mixture comes to a boil and thickens, about 5 minutes. Remove from heat and set aside to cool.

2. To make the dough, get a food processor or use your hand, blend flour, butter, shortening and salt until the mixture resembles a coarse meal and has some pea sized pieces of butter left in it.


3. While pulsing, add water a little at a time until dough comes together when pinched in your hand. Wrap in plastic wrap and refrigerate for at least an hour or up to 1 day.
Preheat oven to 375.

4. When dough is ready, roll chilled pastry out on a lightly floured surface into a 1/8 inch thick rectangle. Cut 4 1/2 inch squares or circles. Fill with about a mounded tablespoon of filling. Seal shut with your fingers . Fold edges over in a decorative shape or seal with the tines of a fork. Re-roll dough scraps to make up to eight circles or squares, allowing it to rest about 10 minutes between rolling.

5. Place hand pie on parchment lined cookie sheet. When all the pies are on the cookie sheet brush with a little milk and generously sprinkle with sugar. Bake about 20-25 minutes until golden brown, rotating cookie sheet half way through baking. Store at room temperature.


Tuesday, January 29, 2008

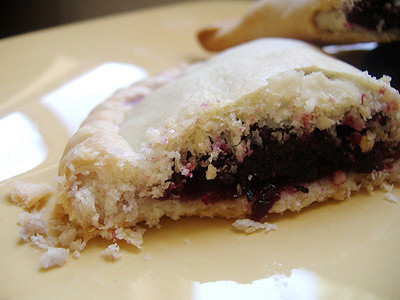
Pop-Tarts


Here at my house, we are big time lovers for pop-tarts. We eats pop-tarts like we breath air. Thank god that we have fast metabolisms, for if we didn't, we'd be bigger than an obese elaphant! So very thankful for that.

I came across this recipe for homemade pop-tarts awhile back when I was browsing threw Peabody's recipe index. When I found it, I knew right away that I wanted to make it. But, I'd never gotten to it. It just kind of sat there in my memories. Till now.

It was actually really easy to make, it didn't take much effort. I made it with two different flavors; Strawberry and Blueberry. There were more Strawberry than Blueberry though... I would have make more blueberry pop-tarts rather than strawberry; because I'm a huge fan for blueberries, But, large majority of people in my family don't like blueberries to much and prefer strawberries much more than blueberries.

I thought the blueberry ones were better ;]


Recipe
For Pie Crust

1 1/2 cups flour
1/2 tsp. salt
1/4 cup shortening
1/4 cup butter, softened
3 tbsp. cold water

For Filling

Jam (your choice)

For Glaze

1 cup powdered sugar
milk to thin

Sprinkles


1. Preheat oven to 450 degrees. Combine flour and salt in a large bowl. Add shortening and butter and blend with a fork, pastry cutter, or your hands. Blend until mixture is fairly coarse. Add water, 1 tbsp. at a time, gently mixing dough after each addiction until dough forms a ball.

2. Place dough on a lightly floured surface and roll into a square/rectangle. To about 1/8 thickness. Cut out long strips about 2 inches wide and 3 inches long. Repeat until dough runs out.

3. Take one pie crust rectangle and lace 1 tsp. of jam on top. Cover with another piece of pie crust and crimp all four edges. Repeat with the rest of dough. Place Pop-tarts on a baking sheet with parchment paper, and bake for 7-8 minutes.

4. While pop-tarts are baking, make glaze. Place powdered sugar in a bowl. Pour milk slowing until it has a consistancy of really thick syrup. 1/2 a tbsp. to 1 tbsp. might be enough.

5. Once pop-tarts are done and cooled, top with glaze. Sprinkle and decorate with colorful sprinkle

Monday, January 28, 2008

DBC: Lemon Meringue Pie


So, the next Daring Bakers Challenge is here... And I have to say, that I have never been so annoyed and frustrated in a baking process like I did with this challenge. This months challenge was the Lemon Meringue Pie. At first, I thought, "Hmm, I'm sure I can do this with ease." Hah!

I'm not much of a pie maker. And defiantly NOT good at making pie crust whats so ever. I've had a few insisidents were it was just pitiful at how the crust came out for past pie making. But I thought if I really tried and went slow with the process of making it, that It'd come out fine.

Three tries later, I finally get a good pie crust! And I was really proud of how the crust came out. It was almost picture perfect crust. Which is a amazing for someone like me who is pron to messing up pie crusts. So it was a true accomplishment for me.

Then came the filling. This wasn't so frustrated as the crust, it just seemed like it took a while for it to thicken. I thought it'd thicken quicker, but it took some time, for what reasons I don't know. But it eventually thicken. Then I did the meringue. Which, I didn't take to much effort into making with sadly. I just kind of dumped the meringue on top of the pie. I wanted to make the pie look all pretty and cute, but by the time I got to this stage, I was just tired of making this pie that I just wanted to get it done.

The pie came out good. I wasn't to proud of the finishing product because it didn't look as pretty and beautiful as I had planned. Nonetheless, still tasted wonderful. But I can see myself trying to make this again. Not just to make to eat, but to get it how I wanted it. I'm pretty stubborn, and I wanted it to come out how I wanted, but it didn't. So I have a new goal as of right now. ;]

To check out other Lemon Meringue Pies, go to the Daring Bakers Blogroll.


Recipe

For the Crust

3/4 cup butter; cut into 1/2 inch pieces
2 cups flour
1/4 cup sugar
1/4 tsp salt
1/3 cup ice water

For the Filling

2 cups water
1 cup sugar
1/2 cup cornstarch
5 egg yolks, beaten
1/4 cup butter
3/4 cup fresh lemon juice
1 tbsp lemon zest
1 tsp vanilla extract

For the Meringue

5 egg whites, room temperature
1/2 tsp cream of tartar
1/4 tsp salt
1/2 tsp vanilla extract
3/4 cup sugar


To Make the Crust:
Make sure all ingredients are as cold as possible. Using a food processor or pastry cutter and a large bowl, combine the butter, flour, sugar and salt.Process or cut in until the mixture resembles coarse meal and begins to clump together. Sprinkle with water, let rest 30 seconds and then either process very briefly or cut in with about 15 strokes of the pastry cutter, just until the dough begins to stick together and come away from the sides of the bowl. Turn onto a lightly floured work surface and press together to form a disk.

Wrap in plastic and chill for at least 20 minutes.Allow the dough to warm slightly to room temperature if it is too hard to roll. On a lightly floured board (or countertop) roll the disk to a thickness of 1/8 inch. Cut a circle about 2 inches larger than the pie plate and transfer the pastry into the plate by folding it in half or by rolling it onto the rolling pin. Turn the pastry under, leaving an edge that hangs over the plate about 1/2 inch. Flute decoratively. Chill for 30 minutes.

Preheat oven to 350ºF. Line the crust with foil and fill with metal pie weights or dried beans. Bake for 20 to 25 minutes. Carefully remove the foil and continue baking for 10 to 15 minutes, until golden. Cool completely before filling.


To Make the Filling:
Bring the water to a boil in a large, heavy saucepan. Remove from the heat and let rest 5 minutes. Whisk the sugar and cornstarch together. Add the mixture gradually to the hot water, whisking until completely incorporated. Return to the heat and cook over medium heat, whisking constantly until the mixture comes to a boil. The mixture will be very thick. Add about 1 cup of the hot mixture to the beaten egg yolks, whisking until smooth.

Whisking vigorously, add the warmed yolks to the pot and continue cooking, stirring constantly, until mixture comes to a boil. Remove from the heat and stir in butter until incorporated. Add the lemon juice, zest and vanilla, stirring until combined. Pour into the prepared crust. Cover with plastic wrap to prevent a skin from forming on the surface, and cool to room temperature.


To Make the Meringue:
Preheat the oven to 375ºF. Using an electric mixer beat the egg whites with the cream of tartar, salt and vanilla extract until soft peaks form. Add the sugar gradually, beating until it forms stiff, glossy peaks. Pile onto the cooled pie, bringing the meringue all the way over to the edge of the crust to seal it completely. Bake for 15 to 20 minutes, or until golden. Cool on a rack. Serve within 6 hours to avoid a soggy crust.

Sunday, October 28, 2007

Brown Butter Creamy Apple Pie


Well, its Fall, and I've yet to make Apple Pie! What's Fall without Apple Pie? And being that I've had a bunch of apples still from when my Nana and Grandpa brought some down from South Carolina for me, I had plenty of apples to make an apple pie.

My Nana and Grandfather also just so happen to be coming by our house this afternoon. So, I thought it was a good opportunity to make Apple Pie. I think of it sort of as a thank you pie for the apples. Thanking by using the apples to make pie!

I don't necessarily favor the double crust apple pies. I like more of the brown sugar topping on the apples. I like that sugar crunch they have when you take a bit. It's like a bit into sugar land. Its a really sweet, cinnamon topping. And the topping for this pie came out beautifully. The pie was so comforting and was really satisfying. The pie also gave off a lovely aroma of cinnamon and sugar apples. It's was lovely all together.


Recipe

Filling

1/4 cup butter
1/2 sugar
1 egg
2 tbsp. flour
5 cups apples, peeled and sliced

Crust

1 frozen deep dish pie crust

Streusel

1/2 cup flour
1/4 cup sugar
1/4 cup packed brown sugar
3/4 tsp. ground cinnamon
1/4 cup firm butter


1. Heat oven to 400 degrees. Place cookie sheet in oven to heat. In 1-quart saucepan, cook 1/4 cup butter over medium heat, stirring constantly, until melted and lightly browned. Cool completely for about 15 minutes.

2. In a large bowl, beat eggs and 1/2 cup sugar until light and fluffy. Beat in 2 tbsp. flour and 1 tsp. vanilla. Beat in cooled butter. Stir in apples. Pour into crust.

3. In a medium bowl, stir together all streusel ingredients together except butter. With pastry blender, fork or your hands, cut in 1/4 cup butter until mixture looks like coarse crumbs. Sprinkle over apples. Place pie on baking sheet in oven.

4. Bake for 20 minutes. Reduce oven temperature to 350 degrees and cover crust with strips of foil to prevent browning. Bake for 40 to 50 minutes longer or until apples are tender and crust is golden brown. Cool completely.


Genesis of a Cook
check out Tastespotting