This month's Daring Bakers Challenge has finally came. And this months was the Perfect Party Cake. I don't know about everyone else, but these last few challenges has been sort of easy. I'm still waiting on something that just really challenges me. But lately that hasn't been the case...
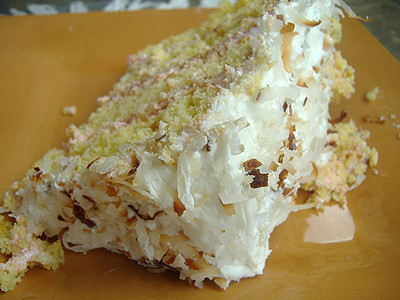
None the less, I was still excited about this months challenge. I'm mean, who doesn't like cake? I pretty much followed the recipe all the way threw, except for the filling. I did not use raspberry because my mothers actually allergic to them. I decided to make a strawberry frosting for the filling because everyone likes strawberries.
I was sort of suprised at how fast this cake went! On the first day I made it, I didn't think to many people would really want to eat some, however, by the time it was 6 pm, more than half the cake was gone! Apparently, my aunt and cousins found out that I had made a cake, and came over to get some. Not that it bothered me, I was actually flattered that they came and got some and loved it.
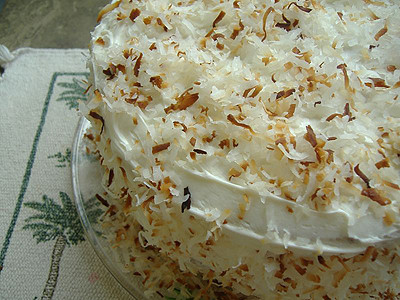
And it was a very nice came. I especially loved the coconut on top. I toasted my coconut because that how I generally like coconut. It being toasted just tastes so much better in my opinion. This months challenge was a very great cake, and now I'm ready for the next challenge. I'm hoping for something very challenging.

Recipe
For the Cake
2 1/4 cups cake flour
1 tbsp. baking powder
1/2 tsp. salt
1 1/4 cups whole milk or buttermilk
4 large egg whites
1 1/2 cups sugar
2 tsp. grated lemon zest
1 stick (8 tbsp.) unsalted butter, at room temperature
1/2 tsp. pure lemon extract
For the Buttercream
1 cup sugar
4 large egg whites
3 sticks (12 ounces) unsalted butter, at room temperature
1/4 cup fresh lemon juice (from 2 large lemons)
1 tsp. pure vanilla extract
For Finishing
2/3 cup seedless raspberry preserves stirred vigorously or warmed gently until spreadable
About 1 1/2 cups sweetened shredded coconut
1. To make the cake, center a rack in the oven and preheat the oven to 350 degrees F. Butter two 9 x 2 inch round cake pans and line the bottom of each pan with a round of buttered parchment or wax paper. Put the pans on a baking sheet.
2. Sift together the flour, baking powder and salt. Whisk together the milk and egg whites in a medium bowl. Put the sugar and lemon zest in a mixer bowl or another large bowl and rub them together with your fingers until the sugar is moist and fragrant. Add the butter and working with the paddle or whisk attachment, or with a hand mixer, beat at medium speed for a full 3 minutes, until the butter and sugar are very light. Beat in the extract, then add one third of the flour mixture, still beating on medium speed. Beat in half of the milk-egg mixture, then beat in half of the remaining dry ingredients until incorporated.
3. Add the rest of the milk and eggs beating until the batter is homogeneous, then add the last of the dry ingredients. Finally, give the batter a good 2- minute beating to ensure that it is thoroughly mixed and well aerated.
4. Divide the batter between the two pans and smooth the tops with a rubber spatula. Bake for 30-35 minutes, or until the cakes are well risen and springy to the touch – a thin knife inserted into the centers should come out clean
5. Transfer the cakes to cooling racks and cool for about 5 minutes, then run a knife around the sides of the cakes, unfold them and peel off the paper liners. Invert and cool to room temperature, right side up (the cooled cake layers can be wrapped airtight and stored at room temperature overnight or frozen for up to two months).

1. To make the Buttercream, put the sugar and egg whites in a mixer bowl or another large heatproof bowl, fit the bowl over a plan of simmering water and whisk constantly, keeping the mixture over the heat, until it feels hot to the touch, about 3 minutes.
2. The sugar should be dissolved, and the mixture will look like shiny marshmallow cream.
Remove the bowl from the heat. Working with the whisk attachment or with a hand mixer, beat the meringue on medium speed until it is cool, about 5 minutes.
3. Switch to the paddle attachment if you have one, and add the butter a stick at a time, beating until smooth. Once all the butter is in, beat in the buttercream on medium-high speed until it is thick and very smooth, 6-10 minutes. During this time the buttercream may curdle or separate – just keep beating and it will come together again.
4. On medium speed, gradually beat in the lemon juice, waiting until each addition is absorbed before adding more, and then the vanilla. You should have a shiny smooth, velvety, pristine white buttercream. Press a piece of plastic against the surface of the buttercream and set aside briefly.

1. To assemble the cake, using a sharp serrated knife and a gentle sawing motion, slice each layer horizontally in half. Put one layer cut side up on a cardboard cake round or a cake plate protected by strips of wax or parchment paper.
2. Spread it with one third of the preserves. Cover the jam evenly with about one quarter of the buttercream. Top with another layer, spread with preserves and buttercream and then do the same with a third layer (you’ll have used all the jam and have buttercream leftover). Place the last layer cut side down on top of the cake and use the remaining buttercream to frost the sides and top. Press the coconut into the frosting, patting it gently all over the sides and top.
Serving
The cake is ready to serve as soon as it is assembled, but I think it’s best to let it sit and set for a couple of hours in a cool room – not the refrigerator. Whether you wait or slice and enjoy it immediately, the cake should be served at room temperature; it loses all its subtlety when it’s cold. Depending on your audience you can serve the cake with just about anything from milk to sweet or bubbly wine.
Storing
The cake is best the day it is made, but you can refrigerate it, well covered, for up to two days. Bring it to room temperature before serving. If you want to freeze the cake, slide it into the freezer to set, then wrap it really well – it will keep for up to 2 months in the freezer; defrost it, still wrapped overnight in the refrigerator.

Playing Around
Since lemon is such a friendly flavour, feel free to make changes in the preserves: other red preserves – cherry or strawberry – look especially nice, but you can even use plum or blueberry jam.
Fresh Berry Cake
If you will be serving the cake the day it is made, cover each layer of buttercream with fresh berries – use whole raspberries, sliced or halved strawberries or whole blackberries, and match the preserves to the fruit. You can replace the coconut on top of the cake with a crown of berries, or use both coconut and berries. You can also replace the buttercream between the layers with fairly firmly whipped sweetened cream and then either frost the cake with buttercream (the contrast between the lighter whipped cream and the firmer buttercream is nice) or finish it with more whipped cream. If you use whipped cream, you’ll have to store the cake the in the refrigerator – let it sit for about 20 minutes at room temperature before serving.


30 comments:
Yum! Looks delicious!
Gorgeous cake! I love the toasted coconut, too. yum!
That cake looks truly incredible. Congratulations on a beautiful cake!
Pretty! I love the toasted coconut.
Good idea to toast the coconut! Yum!!
What a beautiful cake! It's good to know the recipe is not too overwhelming as I have never made a layered cake before.
Very pretty cake - I love toasted coconut.
Very nice, nothing like toasted coconut! Wish I had a piece of my cake left, it's long gone! Great job on the challenge!
thanks, your cake looks absolutely amazing as well!
Looks beautiful!
I love the toasted coconut! Great job!
You're such an inspiration, Tarah ! :) I want to get involved in Daring Bakers, but I'm so terrified. I rarely ever follow instructions and I know you need to follow instructions on these things. I totally wouldn't.
But this looks absolutely beautiful !
That toasted coconut looks great! I love the color and texture contrast. Nice job!
I'm impressed by all you folks who toasted your coconut, it looks so yummy on the white icing. Great job!
Your cake is lovely and I think toasting the coconut is a wonderful idea for next time!
Your cake looks beautiful! Very well done!
Cheers,
Rosa
what a lovely cake!! great idea to decorate it with toasted coconut shread :-)!! the photos look delicious i could imagine the taste already :-)
Lovely cake, I´ve never tasted toasted coconut, but It¨s a great idea. I¨ll do it the next time.
Thanks for the tip.
TERESA
I toasted my coconut as well, looks great!
I balked at adding coconut to mine, but your cake is making me reconsider...maybe next time! Nice work.
your cake is adorable, i love the toasted coconut idea !
Beautiful cake! Glad to hear that you had others to help you eat it . . . feeding people is fun. :)
Your cake looks good! I like the toasted coconut.
What a wonderful cake! I love the toasted coconut and the strawberry filling, Yummy!
I love the toasted coconut! Your cake looks very classy!
that is fantastic that your family loved it, and that you made it for your mom.
Your cake is beautiful!
Great looking, inviting cake- I like the toasted coconut- it adds such dimension to the flavour and visually too!
xoxo
Gabi
Thank you everyone for the comments! :D
Great cake! I agree that toasting the coconut really brings out the flavor in a delicious way!
I, too, was surprised at how quickly the cake went. Fine with me! Your cake looks great...good job.
Post a Comment