Showing posts with label Chocolate. Show all posts

Tuesday, August 18, 2009

Neapolitan Cheesecake


Summer vacation comes to an end..

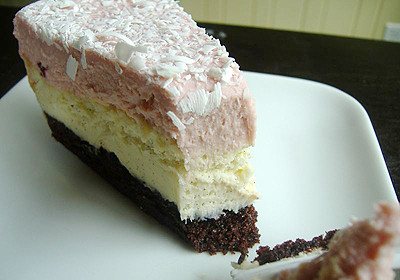
For the Chocolate Crumb Crust

Vanilla Wafer Crumbs (about 45 wafers)
1/2 cup confectioners' sugar
1/4 cup cocoa
1/3 cup melted butter

For Cheesecake Filling

1 pkg. (10 oz.) frozen strawberries, thawed, drained
3 pkg. (8 oz. each) cream cheese, softened
1 1/2 cups sugar
3 eggs
1/3 cup sour cream
3 tbsp. plus 1 tsp. flour, divided
1/2 tsp. vanilla extract
1 vanilla bean, split lengthwise, seeds scraped
1/4 tsp. salt
1/4 tsp. red food color (optional)


1. Preheat oven to 400 degrees.

2. For the chocolate crumb crust, in a small bowl, stir together 1-1/2 cups vanilla wafer crumbs (about 45 wafers), confectioners' sugar and cocoa; stir in melted butter. Press mixture firmly onto bottom of 9-inch springform pan. Bake 8 minutes; cool slightly.

3. In blender container or food processor, puree strawberries to yield 1/2 cup; set aside.

4. In large bowl, beat cream cheese with sugar until smooth and creamy. Add eggs, sour cream, 3 tbsps flour, vanilla, 1 tsp. vanilla bean and salt; beat until smooth.

5. In separate bowl, stir together 1-1/3 cups cheese mixture, strawberries, remaining 1 teaspoon flour and food color, if desired.

6Carefully spoon 2 cups vanilla batter over prepared crust. Pour strawberry batter over vanilla batter; smooth surface.

7. Bake 10 minutes. Reduce oven temperature to 350 degrees; continue baking 55 to 60 minutes or until center of cheesecake is almost set. Remove from oven to wire rack. Cool 30 minutes. With knife, loosen cake from side of pan. Cool completely; remove side of pan. Refrigerate several hours before serving.

Makes 10 to 12 servings

Thursday, April 2, 2009

Peanut Chocolate Chunk Blondies


"What are blondies? I've never had one." asked a little friend of mine. "No.. no way." I said, "I can't believe you've never had a blondie! Your... your missing out!" "What are the exactly?" she asked. I simply answered, "I'll show you."

I was inspired to make these for a friend whom has never had a blondie before. I was going to make my favorite blondies, but since I was at it, I decided to try a new recipe for a blondie, and one with nuts (for what ever reason, I've been going nutty for some reason).

They came out pretty good. My friend really liked them. I'm going to make my favorite ones to give her the better experience of the blondies. These blondie don't beat my favorite blondies :P But, these are really chewy, delicious. I think it's best warm, and of course, with a scoop of ice cream!


Recipe

2 cups flour
1 tsp. baking powder
1/2 tsp. salt
1/4 tsp. baking soda
10 tbsp. salted butter
2 cups packed brown sugar
2 egg
2 tsp. vanilla extract
4 oz. bittersweet chocolate, chopped
3 oz. roasted peanuts, chopped

1. Preheat oven to 350 degrees F. Butter and a flour a 13 x 9 x 2-inch baking pan. Set aside.

2. In a medium bowl, mix together the flour, baking powder, salt, and baking soda. Set aside. Melt the butter in a large sauce pan over low heat. Turn off the heat and whisk in the sugar to blend. Whisk in eggs and vanilla extract.

3. Gradually stir in the flour mixture. Pour into prepared pan and smooth with a spatula. Sprinkle the top with the chopped chocolate and nuts.

4. Bake for about 25 minutes, or until a cake tester inserted in the middle of the pan comes out with moist crumbs attached.

Makes 24 bars


Also, go see Slumdog Millionaire. Quite possibly the best movie I've ever seen.


Saturday, February 28, 2009

Chocolate Valentino


One of my favorite Daring Bakers Challenge, I must admit. Really simple, and really good. That's all I really have to say.


Recipe

February’s challenge is a Flourless Chocolate Cake, Chocolate Valentino, inspired by Malaysia’s “most flamboyant food ambassador”, Chef Wan. Recipe comes from Sweet Treats by Chef Wan

What we Want You to Do:

-Use the following recipe

-Serve with - The original recipe calls for the cake to be served with whipping cream. BUT we decided to make this more of a challenge and ask you to make your own Ice Cream – a first for the DBrs. You can choose any flavour you want and any recipe although we provided two vanilla ice cream recipes. But we are giving you a little freedom here and will allow whipped cream as a topping as well or of course non-dairy whip. Be as creative as you want with your topping. Any fruit puree or sauce would be lovely with this cake.

- Use your favorite chocolate – the finished cake will taste exactly like the chocolate you use. Be creative with your chocolate, if you like a sweeter cake use milk chocolate or a combination of the semisweet and milk chocolate. If you like bittersweet chocolate use that and add sweetness by mixing the semi sweet with bittersweet. If you are daring, try white chocolate. (Dharm used all bittersweet and Wendy used a half bitter/half semi sweet chocolate).

- A higher cocoa percentage increases the bitterness of the chocolate.

-Equipment - it is optional to use a heart shaped pan. For a real Valentino, bake it in a heart shaped pan or cut it out into a heart shape. You may use any shape pan that gives you an area of 50” - 6x8 or 7x7. An 8” spring form pan works with great results as do smaller pans or ramekins.

-An instant read thermometer highly recommended.

Note on recipe - the recipe consists of 3 simple ingredients and how you interpret them is part of the challenge. The simplicity of this recipe gives credit to the ingredients much in the same way of French baguette.

-This recipe comes together very quickly with a hand mixer.

-This is a very decadent cake that will sink a little as it cools but will still hold its shape.

-Very dense and fudgy cake that tastes divine.

-The top forms a light crust kind of like a brownie

Posting Date: February 28, 2009

Printable Recipe:

Chocolate Valentino
Preparation Time: 20 minutes
16 ounces (1 pound) (454 grams) of semisweet chocolate, roughly chopped
½ cup (1 stick) plus 2 tablespoons (146 grams total) of unsalted butter
5 large eggs separated

1. Put chocolate and butter in a heatproof bowl and set over a pan of simmering water (the bottom of the bowl should not touch the water) and melt, stirring often.
2. While your chocolate butter mixture is cooling. Butter your pan and line with a parchment circle then butter the parchment.
3. Separate the egg yolks from the egg whites and put into two medium/large bowls.
4. Whip the egg whites in a medium/large grease free bowl until stiff peaks are formed (do not over-whip or the cake will be dry).
5. With the same beater beat the egg yolks together.
6. Add the egg yolks to the cooled chocolate.
7. Fold in 1/3 of the egg whites into the chocolate mixture and follow with remaining 2/3rds. Fold until no white remains without deflating the batter. {link of folding demonstration}
8. Pour batter into prepared pan, the batter should fill the pan 3/4 of the way full, and bake at 375F/190C
9. Bake for 25 minutes until an instant read thermometer reads 140F/60C.
Note – If you do not have an instant read thermometer, the top of the cake will look similar to a brownie and a cake tester will appear wet.
10. Cool cake on a rack for 10 minutes then unmold.


Sunday, February 22, 2009

Mocha Chocolate Chip Muffins


Caffeine was in need today! I use to be a non stop, coffee everyday kind of person. I was one of those people that didn't think having coffee at 10pm was strange (but it definitely explains why I never slept!). Though I may not drink coffee as much as I use to, I still love coffee. Sunday mornings are the best times for coffee. Just waking up, don't have to do much, switch that coffee maker on and... relax.

But, this isn't coffee. Oh no. This is something better, I guarantee. A sweeter substitution for coffee, or, just a great accomplice to your morning jo'. These muffins are really simple to make, as any muffin really is. I used mini chocolate chip instead of regular chocolate chip, mainly because it was all I had. However, I've tried this recipe with regular chocolate chips and I'd recommend those over mini. Either way though, these muffins will turn out spectacular and start your morning off with you smiling!


Recipe

3 cups flour
1 cup sugar
1 tbsp. baking powder
2 tbsp. dutch-processed cocoa powder
3 tbsp. instant espresso
1/2 tsp. salt
1 1/2 cups whole plain yogurt
2 large eggs
8 tbsp. unsalted butter, melted and cooled
12 ounces semi-sweet chocolate chips


1. Preheat oven to 375 degrees. Line or grease 12 muffin cup pan.

2. In a large bowl, whisk the flour, sugar, baking powder, baking soda, salt, and cocoa powder together. Set aside.

3. In a medium bowl, whisk the yogurt, eggs, and instant espresso together until smooth. Gently fold yogurt mixture into the flour mixture until just combined, then fold in the melted butter.

4. Divide batter into each muffin cup. Bake for 20-25 minutes. Let muffins cool for 5 minutes in pan before removing.


Monday, September 29, 2008

Chocolate Pistachio Cake


Remembering birthday is something most of my family does not seem to know how to do, for it seemed everyone almost forgot about my Nana's birthday. My dad is the worst at remembering birthday. Sadly, he'll forget mine, my moms and my brothers from time to time. I try my best not to forget birthdays. I feel horrible if I forget one. I feel as though that I need to have they're birthday to be a great day!

My Nana's didn't want much for her birthday. She really just wants to ignore the fact that it is her birthday. I think anyone that gets older and older doesn't want to get older and older, you know?

Any who, all she wanted to do was have a family get together. Which included her sisters, my grandfathers brothers, her son (my dad) and his family, and a handful of her friends. I adore my Nana, really, I do. So I wanted to make a nice cake that I know she'd like. She loves chocolate (any woman would) and she's a big pistachio eater. She always has some around the house, ready to be snacked on.

When I came across this recipe on Jens blog at use real butter, it was perfect! It was absolutely perfect for her! And she agreed. She loved it. As well as everyone else. It has a nice salty addiction to it (and we all love salt) and it was just an overall huge hit with everyone. Not to sweet, soft and had enough in each bite.


Recipe

Chocolate cake
Makes one 9×3-inch round cake. Double this recipe to get a 4 layer cake.

1 1/2 cups plus 1 tbsp. all-purpose flour
6 tbsp. unsweetened cocoa
1 tsp. baking soda
1 tsp. salt
1/2 cup butter, plus extra for greasing
2 oz unsweetened chocolate, broken into pieces
1 cup sugar
2 eggs
1 tsp. vanilla extract
1 tsp. red raspberry vinegar
1 cup water

Pistachio Vanilla Buttercream

8 oz egg whites
16 oz sugar
1 lb butter, room temperature
2 tsp vanilla extract
1.5 cups shelled pistachios

Ganache

6 tbsps heavy cream
4 oz semi-sweet chocolate, chopped

1. Preheat oven to 325 degrees. Combine flour, cocoa, baking soda, and salt in a sifter and sift onto wax paper or a bowl and set aside. Coat 2 9×3-inch round pans with butter on the base and sides. Place circular parchment in the bottom and brush with more butter.

2. Melt the unsweetened chocolate over water bath or in the microwave (be suer to keep stirring to prevent burning). Set aside.

3. Beat sugar and butter together in mixer fitted with paddle. Beat on medium for 1 minute, then on high for 1 minute. Scrape down the sides and beat on high for 15 seconds after the addition of each egg. Add vanilla and vinegar and beat on high for 20 seconds. Add the melted chocolate and mix on low for 10 seconds. Scrape down the sides of the bowl.

4. Boil water and operate the mixer on low while adding the sifted dry ingredients. Mix for 10 seconds. Carefully add the boiling water and continue to mix on low for 10 seconds. Increase speed to medium and beat for 5 seconds. Pour batter into pans.

5. Bake for about 45-50 minutes or until toothpick test is clean. Remove from oven and allow cakes to cool in pans for 20 minutes. Remove the cakes from the pans and refrigerate for at least 1 hour.


1. For the pistachio and vanilla buttercreams, combine egg whites and sugar in a mixing bowl. Whisk constantly over a bain marie until 140F is reached. Place on mixer with balloon whisk and whip until stiff. Turn down whip speed to 3rd and whip until cool to the touch (this takes a while - should be cooler than your hand).

2. Change to a paddle and gradually add soft butter by tablespoon pieces. Mix to emulsify. Once desired consistency has been reached, add vanilla. Blanche the pistachios in boiling water for 3 minutes, then drain and place the nuts in a cotton towel. Fold the towel over the nuts and rub vigorously to loosen and remove the skins. Toast the skinned pistachios on a baking sheet for 15 minutes at 325°F. Remove from oven and allow to cool to room temperature. Reserve a few whole ones for garnish. Finely chop the remaining pistachios.

3. Take 2/3 of the buttercream frosting and fold in the pistachios. Save the remaining third of the buttercream for frosting the cake.

4. For the ganache, bring the cream to a boil and remove from heat immediately. Pour over the chocolate (making sure to cover all of the chocolate) and let sit for a minute. Stir until the ganache is smooth and evenly mixed. Put in the refrigerator until firm enough for piping.


To assembly
, cut off the dome tops of the cakes. Slice your cakes into two layers. Place the base of one cake on the serving plate or a cake board. Spread 1/3 of the pistachio buttercream over the layer. Repeat twice more. Top the cake with the other base slice (upside down, so base it facing up). Coat the sides with the vanilla buttercream (a thin layer spread around the entire cake). Then frost the entire cake with the rest of the vanilla buttercream. Decorate the cake with chocolate ganache however you like and garnish with whole pistachios and/or any extra chopped pistachios. Serve at room temperature.


Wednesday, September 3, 2008

Chocolate Chunk Coffee Cake


During this time of the year, when summer is slowing starting to traverse into fall, that I start to get tired of eating anything light and want something a little more heavy. Not so heavy that I feel like I'll gain weight from eating, but heavy enough to where I feel more satisfied about what I just ate. Having to avoid all the sweet I did, it gets rather depressing.

I love eating coffee cake. But its something that I don't care to eat till fall and winter are here. It like how I don't really enjoy pie unless it's fall, or smoothies unless it's summer. I'm pretty picky as to what I eat and when in the year I eat it. It's just how I've been raised I guess.

I didn't come up with this recipe. I found this fabulous recipe from Pete at pete-bakes.com. The only different that I did from his was I did chocolate chunks aside from chocolate chips. Chocolate chunks just sounded better to me at the moment. I also added nutmeg to the cake batter and salt. I thought it would give it more of a tasty kick.

The cake was very enjoyable. The was chocolate chunks to every bite (which I really liked!!). It turned out so light and fluffy and just melt in your mouth delicious. It made a very delicious breakfast with coffee.


Recipe

1/2 cup butter
1 1/2 cups sugar
1/3 cup brown sugar
2 eggs
1 cup sour cream
1 tsp. vanilla
1 tsp. water
2 cups flour
1 1/2 tsp. baking powder
1 tsp. baking soda
1 tsp. cinnamon
1 tsp. salt
1/2 tsp. nutmeg
3/4 cup chocolate chunks


1. In a small bowl, mix 1/2 cup white sugar, brown sugar, cinnamon, chocolate chunks. Set aside.

2. In a large bowl, cream butter, 1 cup white sugar, and eggs. Add the sour cream, vanilla and water.

3. In a separate bowl, mix flour, baking powder, soda, nutmeg and salt. Combine into the wet ingredients.

4. Pour half of the batter into a greased and floured 9×13 inch pan. Sprinkle half of the cinnamon, sugar and chocolate chip mixture on the batter. Pour in the rest of the batter and top with the rest of the cinnamon, sugar and chip mix.

5. Bake at 350 degrees for 30 minutes. Let it cool for at least an hour before cutting into it, or the chocolate chips will be too melty and it will be hard to get out of the pan.


Sunday, August 31, 2008

Chocolate Éclairs


Eclairs were this months Daring Bakers Challenge has come. I was quite excited about this months; as I am with any of them. I had decided to do this months challenge at the beginning of the month for I knew that I wouldn't be able to do anytime later. I would've never had to time.

I've never made Eclairs before. I've also understood the name of Eclairs. It's means "flashing." I wonder what that has anything to do with food. Nonetheless, Eclairs are awesome and I was quite excited about actually making one myself. I've always heard that they're hard. I don't know why people think this. It's kind of like cream puffs. People make them out to seem so difficult when in fact, they're not that hard at all. Making Eclairs isn't that hard at all. You just have to take the time to try.

These were pretty rich. One was enough for me. My little brother, the pickiest person in the house, even liked them. He saw them and actually asked me if he could try one! It took me by surprise, that's for sure. He's an honest kid, like me, so he'd tell me the truth. He said they were really great. He wanted me to make more. He loved the filling and I have to say, so did I. They were great all together. This was a great challenge!


Recipe

Pierre Hermé’s Cream Puff Dough
Recipe from Chocolate Desserts by Pierre Hermé
(makes 20-24 Éclairs)

1/2 cup whole milk
1/2 cup water
1 stick unsalted butter, cut into 8 pieces
1/4 teaspoon sugar
1/4 teaspoon salt
1 cup all-purpose flour
5 large eggs, at room temperature

1. In a heavy bottomed medium saucepan, bring the milk, water, butter, sugar and salt to the
boil.

2. Once the mixture is at a rolling boil, add all of the flour at once, reduce the heat to medium
and start to stir the mixture vigorously with a wooden spoon. The dough comes together very
quickly. Do not worry if a slight crust forms at the bottom of the pan, it’s supposed to. You
need to carry on stirring for a further 2-3 minutes to dry the dough. After this time the dough
will be very soft and smooth.

3. Transfer the dough into a bowl of a mixer fitted with the paddle attachment, or using your
handmixer or if you still have the energy, continue by hand. Add the eggs one at a time,
beating after each egg has been added to incorporate it into the dough.
You will notice that after you have added the first egg, the dough will separate, once again do
not worry. As you keep working the dough, it will come back all together again by the time you
have added the third egg. In the end the dough should be thick and shiny and when lifted it
should fall back into the bowl in a ribbon.

4. The dough should be still warm. It is now ready to be used for the éclairs as directed above.

Notes:
1. Once the dough is made you need to shape it immediately.

2. You can pipe the dough and the freeze it. Simply pipe the dough onto parchment-lined baking
sheets and slide the sheets into the freezer. Once the dough is completely frozen, transfer the
piped shapes into freezer bags. They can be kept in the freezer for up to a month.


Chocolate Pastry Cream
Recipe from Chocolate Desserts by PierreHermé

2 cups whole milk
4 large egg yolks
6 tbsp sugar
3 tbsp. cornstarch, sifted
7 oz bittersweet chocolate, preferably Velrhona Guanaja, melted
2 1/2 tbsp unsalted butter, at room temperature

1. In a small saucepan, bring the milk to a boil. In the meantime, combine the yolks, sugar and cornstarch together and whisk in a heavy‐bottomed saucepan.

2. Once the milk has reached a boil, temper the yolks by whisking a couple spoonfuls of the hot milk into the yolk mixture.Continue whisking and slowly pour the rest of the milk into the tempered yolk mixture.

3. Strain the mixture back into the saucepan to remove any egg that may have scrambled. Place the pan over medium heat and whisk vigorously (without stop) until the mixture returns to a boil. Keep whisking vigorously for 1 to 2 more minutes (still over medium heat).Stir in the melted chocolate and then remove the pan from the heat.

4. Scrape the pastry cream into a small bowl and set it in an ice‐water bath to stop the cooking process. Make sure to continue stirring the mixture at this point so that it remains smooth.

5. Once the cream has reached a temperature of 140 F remove from the ice‐water bath and stir in the butter in three or four installments. Return the cream to the ice‐water bath to continue cooling, stirring occasionally, until it has completely cooled. The cream is now ready to use or store in the fridge.

Notes:
1. The pastry cream can be made 2‐3 days in advance and stored in the refrigerator.

2. In order to avoid a skin forming on the pastry cream, cover with plastic wrap pressed onto the cream.

3. Tempering the eggs raises the temperature of the eggs slowly so that they do not scramble.


Chocolate Glaze
Recipe from Chocolate Desserts by Pierre Hermé
(makes 1 cup or 300g)

1/3 cup heavy cream
3 1/2 oz bittersweet chocolate, finely chopped
4 tsp unsalted butter, cut into 4 pieces, at room temperature
7 tbsp Chocolate Sauce (recipe below), warm or at room temperature

1. In a small saucepan, bring the heavy cream to a boil. Remove from the heat and slowly begin to add the chocolate, stirring with a wooden spoon or spatula.

2, Stirring gently, stir in the butter, piece by piece followed by the chocolate sauce.

Notes:
1. If the chocolate glaze is too cool (i.e. not liquid enough) you may heat it briefly
 in the microwave or over a double boiler. A double boiler is basically a bowl sitting over (not touching) simmering water.

2. It is best to glaze the eclairs after the glaze is made, but if you are pressed for time, you can make the glaze a couple days ahead of time, store it in the fridge and bring it up to the proper temperature (95 to 104 F) when ready to glaze.


Chocolate Sauce
Recipe from Chocolate Desserts by Pierre Hermé
(makes 1½ cups or 525 g)


4 1/2 oz bittersweet chocolate, finely chopped
1 cup water
1/2 cup crème fraîche, or heavy cream
1/3 cup sugar

1. Place all the ingredients into a heavy‐bottomed saucepan and bring to a boil, making sure to stir constantly. Then reduce the heat to low and continue stirring with a wooden spoon until the sauce thickens.

2. It may take 10‐15 minutes for the sauce to thicken, but you will know when it is done when it coats the back of your spoon.

Notes:
1. You can make this sauce ahead of time and store it in the refrigerator for two weeks. Reheat the sauce in a microwave oven or a double boiler before using.
2) This sauce is also great for cakes, ice-cream and tarts.

Start Baking
1. Preheat your oven to 375 degrees F (190 degrees C). Divide the oven into thirds by
positioning the racks in the upper and lower half of the oven. Line two baking sheets with
waxed or parchment paper.

2. Fill a large pastry bag fitted with a 2/3 (2cm) plain tip nozzle with the warm cream puff dough.
Pipe the dough onto the baking sheets in long, 4 to 41/2 inches (about 11 cm) chubby fingers.
Leave about 2 inches (5 cm) space in between each dough strip to allow them room to puff.
The dough should give you enough to pipe 20-24 éclairs.

3. Slide both the baking sheets into the oven and bake for 7 minutes. After the 7 minutes, slip the
handle of a wooden spoon into the door to keep in ajar. When the éclairs have been in the
oven for a total of 12 minutes, rotate the sheets top to bottom and front to back. Continue
baking for a further 8 minutes or until the éclairs are puffed, golden and firm. The total baking
time should be approximately 20 minutes.

Notes:
1. The éclairs can be kept in a cool, dry place for several hours before filling.


Assembling the éclairs:

1. Slice the éclairs horizontally, using a serrated knife and a gently sawing motion. Set aside the
bottoms and place the tops on a rack over a piece of parchment paper.

2. The glaze should be barely warm to the touch (between 95 – 104 degrees F or 35 – 40
degrees C, as measured on an instant read thermometer). Spread the glaze over the tops of
the éclairs using a metal icing spatula. Allow the tops to set and in the meantime fill the
bottoms with the pastry cream.

3. Pipe or spoon the pastry cream into the bottoms of the éclairs. Make sure you fill the bottoms
with enough cream to mound above the pastry. Place the glazed tops onto the pastry cream
and wriggle gently to settle them.

Notes:
1. If you have chilled your chocolate glaze, reheat by placing it in a bowl over simmering water,
stirring it gently with a wooden spoon. Do not stir too vigorously as you do not want to create
bubbles.

2. The éclairs should be served as soon as they have been filled.


Wednesday, July 2, 2008

Strawberry Cream Cake


Seems likes it's getting muggier and muggier here in Florida each day. The non stop pouring rain and the rising heat is killer. I love and hate Florida. This being one of the reasons I hate Florida.

Since it's been so very hot out, I haven't really been baking as much as I use to. I mean, why would I stand around a hot oven and sweat my butt off even more than I already am? It also doesn't help that our air conditioner seriously sucks. I swear out conditioner literally loathes us. We've tried so many times to get it fixed, yet, it always decides to brake down and not work. It's always pms-ing!

But, I wasn't going to let the heat keep me from baking for to long. I've been really craving cake lately, which is strange because I don't exactly love cake. I like it, but it's not something I necessarily love. But I wanted it. And the heat was not going to keep me from making cake, no I was not. My mom found a recipe awhile back for a Strawberry Cream Cake in Cooks Illustrated that I knew I wanted to make eventually, but after seeing Lisa's, Pittsburgh Needs Eated, post on the cake, I decided that this was what I was going to make.

The cake turned out excellent! One of the best I've had, seriously. It was so light and so tasty. I couldn't help but get another slice. It was so good. It's a great light and refreshing cake for the summer!


Recipe

Cake

1 1/4 cups flour
1 1/2 tsp. baking powder
1/4 tsp. salt
1 cup sugar
5 large eggs (2 whole and 3 separated)
6 tbsp. butter , melted
2 tbsp. water
2 tsp. vanilla

Strawberry Filling

2 quarts fresh strawberries, washed, dried, and stemmed
4–6 tbsp. sugar
2 tbsp. kirsch
Pinch of salt

Whipped Cream

8 ounces cream cheese, room temperature
1/2 cup sugar
1 tsp. vanilla
1/8 tsp. salt
2 cups heavy cream


1. For the cake,Preheat oven to 325 degrees. Grease and flour round 9 by 2-inch cake pan or 9-inch springform pan and line with parchment paper. Whisk flour, baking powder, salt, and all but 3 tablespoons sugar in mixing bowl. Whisk in 2 whole eggs and 3 yolks (reserving whites), butter, water, and vanilla and whisk until smooth.

2. In clean bowl of standing mixer fitted with whisk attachment, beat remaining 3 egg whites at medium-low speed until frothy, 1 to 2 minutes. With machine running, gradually add remaining 3 tablespoons sugar, increase speed to medium-high, and beat until soft peaks form, 60 to 90 seconds.

3. Stir one-third of whites into batter to lighten; add remaining whites and gently fold into batter until no white streaks remain. Pour batter into prepared pan and bake until toothpick or wooden skewer inserted into center of cake comes out clean, 30 to 40 minutes. Cool in pan 10 minutes, then cool completely for about 2 hours.

4. For the strawberry filling, Halve 24 of best-looking berries and reserve. Quarter remaining berries; toss with 4 to 6 tablespoons sugar (depending on sweetness of berries) in medium bowl and let sit 1 hour, stirring occasionally. Strain juices from berries and reserve (you should have about 1/2 cup). In a food processor fitted with metal blade, give macerated berries five 1-second pulses (you should have about 1 1/2 cups). In small saucepan over medium-high heat, simmer reserved juices and Kirsch until syrupy and reduced to about 3 tablespoons, 3 to 5 minutes. Pour reduced syrup over macerated berries, add pinch of salt, and toss to combine. Set aside until cake is cooled.

5. For the whipped cream, place cream cheese, sugar, vanilla, and salt in bowl of standing mixer fitted with whisk attachment. Whisk at medium-high speed until light and fluffy, 1 to 2 minutes, scraping down bowl with rubber spatula as needed. Reduce speed to low and add heavy cream in slow, steady stream; when almost fully combined, increase speed to medium-high and beat until mixture holds stiff peaks, 2 to 2 1/2 minutes more, scraping bowl as needed.

6. To assemble the cake, slice cake into three even layers (or two like me). Place bottom layer on cardboard round or cake plate and arrange ring of 20 strawberry halves, cut sides down and stem ends facing out, around perimeter of cake layer. Pour one half of pureed berry mixture (about 3/4 cup) in center, then spread to cover any exposed cake. Gently spread about one-third of whipped cream (about 1 1/2 cups) over berry layer, leaving 1/2-inch border from edge. Place middle cake layer on top and press down gently (whipped cream layer should become flush with cake edge). Repeat with 20 additional strawberry halves, remaining berry mixture, and half of remaining whipped cream; gently press last cake layer on top. Spread remaining whipped cream over top; decorate with remaining cut strawberries. Serve, or chill for up to 4 hours.


Friday, May 30, 2008

White Chocolate Blueberry Tart


Blueberries have been going on sale a lot lately here in Florida, so, I decided to take the opportunity to stock up on a few blueberries since they're always so expensive! And I love blueberries, but buying them as much as I'd like kind adds up to be pretty costly. There were actually a lot of things that I thought of to make with the blueberries, but one thing really stuck with me. A blueberry tart; With chocolate! Oh yea. Winner. Ding, ding, ding! So, that's exactly what I did. Made one awesome blueberry tart.

What I loved most about this was defiantly the crust! The cashews really gave it a awesome taste! If you don't really like cashews though, you could always use other nuts that you prefer. Pecans, almonds, walnuts; Whatever to your choosing. But, I'd have the say that the cashews really complemented with the blueberries and chocolate. I would say try it. I'll defiantly be keeping this recipe for the crust in memory for the future. It was just so good.

The whole things was awesome in general. You have to keep in in the fridge or freezer. For me however, living in the Sunshine State where heat is out enemy, I had to keep it in the freezer since it has been killer hot out. If you were to take ice out of the freezer, it would begin to melt. So I thought I'd be safe and put the tart in the freezer so that I wouldn't have to fear that it would melt! Anyways, I really liked this recipe. Everything came together really well and very much enjoyed it! It's typically a very easy dessert, too! You'll love it!


Recipe

For the Crust

2/3 cup cashews, finely chopped
1 egg, slightly beaten
1/4 cup butter
2/3 cup flour
1/4 cup sugar
1 tsp. orange zest

For the Filling

1 cup white chocolate
2 tbsp. butter
2/3 cup heavy cream
1/2 cup fresh blueberries


1. For the crust, preheat oven to 375 degrees degrees. Lightly grease a 9-inch tart pan or 4 small tarts pans. Place all ingredients for the crust into a food processor, and mix until combined well. Press the mixture into prepared tart pan (or 4 small tart pans), using the back of a small spoon (the mixture will have a crumbly texture). Refrigerate crust for 15 minutes. Bake in preheated oven for 25 to 30 minutes. Let crust cool.

2. Break the chocolate into pieces in a large glass bowl placed over a saucepan of boiling water. Stir occasionally until melted. Remove from heat, and stir in the 2 tbsp. butter until melted. Mix in the heavy cream, and whisk until smooth.

3. Spread the blueberries over the tart crust, then pour the chocolate mixture evenly over the top. Chill in refrigerator for at least 3 hours, so that the chocolate sets. Garnish with walnut halves.

Makes 6 to 8 servings.


Sunday, May 25, 2008

Red Velvet Cupcake Bites


Nope, those are not what you may think they are. They are not cupcakes. They are in fact the red velvet balls that I made at one point. But, they are decorated to look like they are cute, tiny little cupcakes!

I can not take credit for these adorable little cute cupcake bites. I got the idea from the creative genius at bakerella. The idea's she comes up with always leave me speechless. Everything she makes are so cute and so beautifully done. Everything always amazes me. I came across this idea from here when she posted her here. I defiantly saved it to my memory as soon as I saw it. I wanted to make them soon!

It made me so excited when I was told a few people at my moms work wanted me to make the red velvet cake balls I made one time. I couldn't wait to make these. They were so much fun to make and so cute! And of course, they were soo good!


Recipe

1 box cake mix (cook as directed on box for 13 X 9 cake)
1 can cream cheese frosting (16 oz.)
1 package chocolate bark (or candy melts for cupcake bottom)
Colored Candy Melts (for cupcake top)
Candy Cup Mold
Sprinkles and m&ms for decoration


1. After cake is cooked and cooled completely, crumble into large bowl. (The texture should be fine/fluffy)

2. Using the back of a large spoon, mix thoroughly with 1 can cream cheese frosting. (It may be easier to use fingers to mix together, but be warned it will get messy.)

3. Roll mixture into quarter size balls (make sure they are smaller in diameter than that of your candy mold) and lay on wax paper covered cookie sheet.

4. Chill in the freezer for a few minutes, until they are slightly firm, not frozen.

5. Melt chocolate bark and candy melts in microwave per directions on package.

6. Using a spoon or squeeze bottle, fill each mold cavity with a small amount of chocolate. Sorry, I didn't think to measure how much. But as soon as you fill the cavity, go ahead and place one of your rolled balls into it. Carefully push it down until the force causes the chocolate to push up and fill in around the sides of the ball. You may have to experiment with a couple to get the right amount. Stop pushing once the chocolate reaches the top edge.

7. Place the mold tray filled with cupcakes in the freezer for just a few minutes to let the chocolate set. Remove and then gently pull up on the cake ball top to release from candy mold.

8. Now, holding the bottom of the cupcake, dip the top in another color of melted chocolate.

9. Decorate.


Friday, May 23, 2008

Chocolate Marshmallow Delights


Marshmallows, in all honestly, are not my kind of thing. I'm not exactly the marshmallow kind of girls. Unless they're in a rice crispy or are melted between graham crackers and chocolate, I'm not one to eat it. However, when I cake across this recipe when looking threw one of Martha Stewart's Cookie Book (which is a must have for any cookie lover out there), I had to stop on the page and marvel at the cookies. They looked so good! And I had been in the mood lately for a really good cookies; But not just a simple cookie. So I decided that I'd go ahead and try these.

I really liked the cookies itself before the frosting and marshmallows. It was very cake like. It kind of had the texture like my Peanut Butter Munchies, which, I really like. I liked the frosting idea. It gave the cookies a nice coating over it. But, I think I have a better idea (which I will probably do soon). All in all, there were pretty awesome. Any chocolate + marshmallow lovers out there must try these!


Recipe

For the Cookies

1 3/4 cup flour
3/4 cup unsweetened cocoa powder
1/2 tsp. baking soda
1/2 tsp. course salt
1/2 cup butter, softened
1 cup sugar
1 large egg
1/2 cup whole milk
1 tsp. vanilla extract
About 15 marshmallows, halved crosswise

For the Frosting

3 cups confectioners' sugar
6 tbsp. unsalted butter, room temperature
1/4 cup plus 1 1/2 tsp. unsweetened cocoa powder
1/2 cup plus 2 tbsp. whole milk
3/4 tsp vanilla extract


1. Preheat oven to 375 degrees. Make cookies: Sift together flour, cocoa, baking soda, and salt into a bowl.

2. Put butter and sugar into the bowl and mix on medium high until fluffy and pale, about 2 minutes. Reduce speed to medium low; mix in egg, milk and vanilla. Mix in flour mixture, 1/2 cup at a time, until combined.

3. Using a 1 3/4-inch ice cream scoop, drop dough onto baking sheets lined with parchment paper, spacing 2 inches apart. Bake cookies, rotating sheets halfway through, until firm, 8 to 10 minutes. Immediately press a marshmallow half on top of each cookie. Bake until marshmallows begin to melt, 2 minutes more. Let cool completely on sheets on wire racks.

4. To make the frosting, Put powdered sugar in a medium bowl. Melt butter with the cocoa in a sauce pan over medium-low heat, stirring occasionally. Add butter mixture to the powdered sugar. Whisk in milk and vanilla.

5. Spread about 1 tbsp. of frosting on top of each cookie to cover marshmallow. Let stand until set, about 10 minutes. Cookies can be stored in single layers in airtight containers at room temperature up to 2 days.


Monday, May 12, 2008

Mocha Cupcakes


Coffee is most defiantly an addiction of mine. I absolutely love coffee. Anything coffee, I'll have. Baking with coffee, well, its something I love to bake with. From muffins to cupcakes to cookies to pastries. I love it. Muffins are my norm for coffee, but, I really wanted to have a cupcake to do. And what better than to have coffee and chocolate in the little package of a cupcake?

These cupcakes are very moist and super rich that it'll have coffee fanatics like myself jumping with joy. The Kahlua Frosting was fanamnal with these cupcakes. I got the recipe from a friend of mine whom loves cupcakes and loves making homemade frosting. She's totally against store bought frosting (as am I), and when I told her that I was making Mocha Cupcakes, she said that this would be perfect with them. And they were! They were to die for!


Recipe

Cupcakes

1 1/3 cups flour
1/3 cup unsweetened cocoa powder
1 tsp. baking powder
1/2 tsp. baking soda
1/4 tsp. salt
1/2 cup whole milk
1/2 cup strong brewed coffee, room temperature
1/2 cup butter, room temperature
1/2 cup granulated sugar
1/2 cup firmly packed light brown sugar
1 large egg, at room temperature


1. Preheat oven to 350°F. Line 12-cup muffin pan with paper or foil liners. In a large bowl, sift together the flour, cocoa powder, baking powder, baking soda, and salt. Set aside.

2. In another bowl, combine the milk and brewed coffee. Using an electric mixer on medium-high speed, beat the butter and sugars together until light and fluffy, 2-3 minutes. Add the egg and beat until combined.

3. Add the flour mixture in 3 additions, alternating with the milk mixture in 2 additions, beating on low speed until just combined; scrape down the sides of the bowl as needed.

4. Divide the batter evenly among the prepared muffin cups, filling each about 3/4 full. Bake until a toothpick inserted in the center of a cupcake comes out clean, 20-22 minutes. Let the cupcakes cool in the pan on a wire rack for 5 minutes. Transfer the cupcakes to the wire rack and let cool completely, about 1 hour.


Kahlua Frosting

4 ounces cream cheese, room temperature
6 tbsp. butter, room temperature
2 1/2 tbsp. Kahlua
2 cups powdered sugar


1. In a bowl, cream together cream cheese and butter until fluffy. Mix in Kahlua, then powdered sugar in one cup increments until frosting reaches desired consistency. Apply to cupcakes.


Thursday, May 8, 2008

Peanut Butter Cookies


After my first entry, the Peanut Butter Torte for the new blogging event I recently joined, Tuesdays with Dorie, I had left over peanut butter that would be of better use with baking rather than being slabbed onto a slice of bread.

I hadn't had peanut butter cookies in so long. I use to eat them all the time when I was at my aunts house. She use to make cookies all the time (actually, she still does!), but I don't go there as often as I use to, but when I do, theres always something that she baked. She loves to cook and bake, and they're all awesome! But, thats beside the point.

I was just really in the mood for a good peanut butter cookie. I knew everyone in the house would love them, especially Chris and my father. They both love peanut butter. They both love peanut butter but try not to have it to often. But, I knew that they would like these, and so would I. They are really delicious, and I make them teaspoonful for smaller cookies for snacks. There just amazing. I even caught my dad sneaking a cookie late last night (he'll never admit it though..).


Recipe

1 1/4 cups flour
3/4 tsp. baking soda
1/2 tsp. baking powder
1/4 tsp. salt
1/2 cup butter, softened
1 cup peanut butter (smooth or chunky)
3/4 cup plus some for sprinkling
1/2 cup packed brown sugar (I used light, though, dark would be fine)
1 egg
1 tbsp. milk
1 tsp. vanilla
3/4 cup chocolate chips


1. Preheat oven to 350 degrees. In a large bowl, combine flour, baking soda, baking powder, and the salt. Set aside.

2. In another bowl, beat in the butter and the peanut butter until fluffy. Add sugar and beat until smooth. Add egg and mix well. Then add the milk and the vanilla.

3. Slowly add the dry mixture into the wet mixture and beat thoroughly. Fold in the chocolate chips. Place some sugar on a plate for sprinkling. Drop by rounded teaspoonfuls into the sugar, then onto baking sheet lined with parchment. Leave about 1 inch between each cookie. Using a fork, lightly indent with a criss cross pattern.

4. Bake for 10 to 12 minutes. Do not overbake. Cool the cookies on the sheets for 1 minute, then remove to a rack to cool completely.


Tuesday, May 6, 2008

Peanut Butter Torte


Theres been a blogging group that I've really been wanting to join for awhile now. Tuesdays with Dorie. You have to have a book to join this group, and I didn't have the book; Till now. I finally got the book so that I could finally join the group, and I didn't hesitate to join.

It was actually kind of funny. Before I saw what the next challenge was, I looked threw the book to see what all recipes there was. And one of them that really shout out to me was the Peanut Butter Torte. It was just beautiful, and sounded, as well as looked, unbelievable. I knew that I wanted to make it soon; And who knew that'd it'd be one of the first things that'd I'd bake!

This weeks challenge was the Peanut Butter Torte. I knew that I was going to love this because, I mean, come on. It's peanut butter! One of those things that make you happy and certainly bring bake being a kid.

I really liked the crust for this. An Oreo crust is my favorite kind of crust to have on an cake, cheesecake, or anything else that has a crust. I was kind of unsure as to if it'd pair will with the peanut butter. I didn't really think that'd be that good together. But they were! They were excellent together! And I defiantly have gotten my peanut butter dose!


Recipe


1 1/4 cup peanuts, finely chopped
1/4 tsp. instant espresso powder
1/4 tsp. ground cinnamon
Pinch of nutmeg
2 tsp. sugar
1/2 cup mini chocolate chips
24 Oreo cookies, finely crumbled
4 tbsp. (1/2 stick) butter, melted
Pinch of salt
2 1/2 cup heavy cream
1 1/4 cup confectioner sugar, sifted
12 ounces cream cheese, softened
1 1/2 cup peanut butter
2 tbsp. milk
4 ounces chocolate, finely chopped


1. Preheat oven to 350 degrees. Butter a 9-inch springform pan and place on a baking sheet lined with parchment paper. Toss 1/2 cup of the chopped peanuts, the sugar, espresso powder, cinnamon, nutmeg and chocolate chips together in a small bowl. Set aside.

2. Put the Oreo crumbs (you can crumbled in a food processor or a blender), melted butter and salt in a small bowl and stir to combine until moistened. Press the crumbs evenly over the bottom and the sides of a springform pan (they should go up about 2 inches up on the sides). Freeze the crust for 10 minutes.

3. Bake the crust for 10 minutes, then transfer to a rack and let cool completely before filling. With a stand mixer, whip 2 cups on the cream until it holds medium peaks. Beat in 1/4 cup of confectioner sugar. Scrape the cream into a bowl and refrigerate until needed.

4. Wipe out the bowl (no need to wash) and beat in the cream cheese with the remaining 1 cup of confectioner sugar on medium speed until cream cheese is satiny smooth. Beat in the peanut butter, 1/4 cup chopped peanuts and the milk.

5. Using a spatula, gently stir in about one quarter of the whipped cream, just to lighten the mousse. Stir in the crunchy peanut butter mixture, gingerly fold remaining whipped cream.

6. Scrape the mousse into the crust, mounding and smoothing the top. Refrigerate for at least 4 hours, or overnight; cover with plastic wrap as soon as the mousse firms.


To Finish it Up

7. To finish the torte, put the chocolate in a heatproof bowl and set the bowl over a saucepan of simmering water. Leave bowl over the water till it starts to melt. Remove from the saucepan.

8. Bring the remaining 1/2 cup cream to a full boil. Pour the cream over the chocolate and blend until glossy. Pour over torte, smoothing with a metal spatula. Scatter remaining 1/2 cup peanuts over torte and chill until the top is set. Refrigerate until ready to serve.


Sunday, April 27, 2008

Cheesecake Pops


Cheesecake Pops


Once again, this months Daring Bakers Challenge is here. To be completely honest, I was hoping for something more... Well, challenging. This months challenge was to make Cheesecake Pops. I don't know if it were just me, but it seemed way to easy. Nonetheless, I still was looking forward to making these. They seemed interesting and I'd never made them before. So I was still all for trying something I'd never made.

The recipe was pretty simple. However, the baking time... It said for 35-45 minutes, but, for me, it took almost an hour. That was probably the only thing that I'd had trouble with. The time. When it came to coating them, I first coated one completely with chocolate. I didn't like it. The chocolate over powered the taste of the cheesecake. You couldn't really taste the cheesecake because the chocolate was over powering it. So, instead of coating it completely with chocolate, I drizzled it. Much better in my opinion.

It was an o.k. pop in my opinion. My taste buds don't necessarily like the taste of just plain cheesecake. I'd want some more flavor in it. I'd probably would had liked it more that way. Nonetheless, it was still a good pop.


Cheesecake Pops


Recipe

5 packages (8-oz. ) cream cheese, room temperature
2 cups sugar
1/4 cup all-purpose flour
Cheesecake Pops1/4 tsp. salt
5 large eggs
2 egg yolks
2 tsp. pure vanilla extract
1/4 cup heavy cream
Boiling water as needed

30-40 lollipop sticks

1 pound chocolate, finely chopped
2 tbsp. vegetable shortening

Assorted decorations such as chopped nuts, colored jimmies, crushed peppermints, mini chocolate chips, sanding sugars, dragees) - Optional

(Note: White chocolate is harder to use this way, but not impossible)


1. Position oven rack in the middle of the oven and preheat to 325 degrees F. Set some water to boil.

2. In a large bowl, beat together the cream cheese, sugar, flour, and salt until smooth. If using a mixer, mix on low speed. Add the whole eggs and the egg yolks, one at a time, beating well (but still at low speed) after each addition. Beat in the vanilla and cream.

3. Grease a 10-inch cake pan (not a springform pan), and pour the batter into the cake pan. Place the pan in a larger roasting pan. Fill the roasting pan with the boiling water until it reaches halfway up the sides of the cake pan. Bake until the cheesecake is firm and slightly golden on top, 35 to 45 minutes.

4. Remove the cheesecake from the water bath and cool to room temperature. Cover the cheesecake with plastic wrap and refrigerate until very cold, at least 3 hours or up to overnight.

5. When the cheesecake is cold and very firm, scoop the cheesecake into 2-ounce balls and place on a parchment paper-lined baking sheet. Carefully insert a lollipop stick into each cheesecake ball. Freeze the cheesecake pops, uncovered, until very hard, at least 1 – 2 hours.

6. When the cheesecake pops are frozen and ready for dipping, prepare the chocolate in the top of a double boiler, stirring often, until chocolate is melted and chocolate and shortening are combined. Stir until completely smooth.

7. Quickly dip a frozen cheesecake pop in the melted chocolate, swirling quickly to coat it completely. Shake off any excess into the melted chocolate. If you like, you can now roll the pops quickly in optional decorations. You can also drizzle them with a contrasting color of melted chocolate (dark chocolate drizzled over milk chocolate or white chocolate over dark chocolate, etc.) Place the pop on a clean parchment paper-lined baking sheet to set. Repeat with remaining pops, melting more chocolate and shortening as needed.

8. Refrigerate the pops for up to 24 hours, until ready to serve.


Cheesecake Pops


Cheesecake Pops
 
 
Genesis of a Cook
check out Tastespotting